
DSLR Astro Photography with Astronomik Clip-Filter System
I decided that I would dive into astrophotography long before I’d purchased my first telescope. In fact, my first foray into this dark art involved a DSLR, a 50-mm lens and a secondhand Orion EQ-1 mount with a motor drive. It was a modest start, but it was enough to light the fire.
From there, I’ve bought, sold and upgraded almost every component of my astronomy rig. There is one component, however, that hasn’t changed: I’ve still got that DSLR. While I’ve added a couple more that are better suited to astrophotography, the DSLR has been the only stable part of my imaging setup.
I’ve looked for reasons to switch from my trusty DSLR to a dedicated CCD, and trust me, there are reasons aplenty. From higher sensitivity to lower noise, there are features that make the switch all but obvious. I’ve used them, and they truly are remarkable. The files I’ve captured with dedicated CCDs are unparalleled, especially by a typical DSLR. That said, I’ve never seriously considered making the switch. I just enjoy the simplicity of the DSLR, and that set-it-and-forget-it mentality keeps me coming back.
There is, however, one feature that keeps me looking at crossing over. Narrowband imaging is the most significant “missing piece” of the puzzle for a standard DSLR and DSLR astro photography. The same components that make imaging with a DSLR simple are the ones that make it tough to use for narrowband imaging. The Bayer matrix that allows for one-shot color also filters out most of the photons gathered during narrowband imaging.
Just when I’d decided to take another look at CCDs, I discovered the Astronomik Clip-Filter System for Canon EOS cameras. They are custom-made filters that fit inside the housing of the camera, just behind the lens or T-ring. No tools are necessary to use them, as they just pop in and out. With such a specialized filter set available, I was reinvigorated to give DSLR astro photography yet another chance.
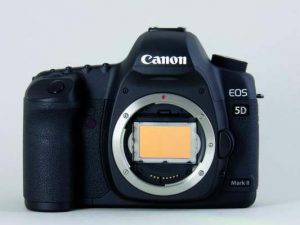
The Astronomik Clip-Filters come in two different sizes: the EOS or “standard” size fits Canon cameras with the APS-C sensor, and the EOS XL size works with Canon Full-Frame cameras.
As for the specific filters offered, the list is extensive. They include: L (UV+IR Blocker), MC-Clear, OWB, 6-nm H-alpha, 12-nm H-alpha, S-II, O-III, H-beta, CLS, UHC, Pro Planet IR742, and Pro Planet IR 807.
Several of them have built-in IR-blocking capabilities, and this is indicated with “CCD” in the filter name. The filters fit between any T-ring and telescope, and they also work with Canon EF lenses. Canon EF-S lenses protrude too far into the camera body, so these don’t work with this system.
A secondary feature of the filters, especially the ones for the APS-C cameras, is that they keep the sensor nice and clean. The filter forms a barrier that’s fairly secure against foreign particles, and it’s certainly better than nothing.
Once I’d researched it and decided once again to hang onto the DSLR, I ordered several of the filters. I decided to go with the OWB, L (UV+IR), both H-alpha filters (6-nm and 12-nm), S-II, O-III and UHC. Then I anxiously awaited their arrival. When they showed up, they did not disappoint. The filters arrived very securely packaged, and each was in its own protective sleeve that in turn was inside a nice little plastic case. They were each sealed with a quality-control label, so it’s clear that Astronomik is making sure to only put out a quality product.
Here is a short one minute video showing how easy it is to install and remove the clip filters (article continues below video).
The first filter I tried was the Type 2 OWB (Original White Balance). This filter was supposedly going to make images from my full-spectrum modified Canon T2i appear as they would in a stock camera. Test shots showed just that, and that extra red I craved for astrophotos could be easily filtered for daylight camera use. I was immediately hooked! White balance can be tweaked in processing for daylight imaging with DSLRs that have the “standard” modification, but for full spectrum they need the IR filtration as well. This filter covered both bases instantaneously, and flawlessly, I might add.
To build on my success with the first Astronomik Clip-Filter, it was time to do some astrophotography. A friend of mine, Stan Westmoreland, was also eager to see the filters in action. Knowing that I couldn’t use all of them at once, I recruited him to test some of them out on his own imaging rig. I loaned him the L (UV+IR Blocker), 12-nm H-alpha, SII and OIII filters to use.
Stan images with a Celestron EdgeHD 11 coupled with a Canon XSi and HyperStar, all mounted on a CGEM DX. This puts his focal ratio around f/2, which is perfect for narrowband with a DSLR. One concern is that at f/2 there will be transmission loss at the filter. This is because narrowband filters shift off-band when coupled with such ultra-fast optical systems. It’s typically not a significant issue if the appropriate band pass is used. The three narrowband filters Stan borrowed all had a 12-nm band pass, so there were no problems. If you are imaging with a similarly-fast optical system, you should probably avoid the 6-nm H-alpha filter.
After getting used to focusing with narrowband imaging, Stan immediately found success with the Astronomik Clip-Filters. He started with the Rosette Nebula, where he combined images taken with the H-alpha, O-III and S-II filters. At f/2 and ISO 800, he was still using 10-minute exposures. This illuminates that drawback of the DSLR, but if you have a mount that tracks and guides well, it’s not a big deal. Between the three filters, he gathered 9 hours of integration time. The results were mapped in the Hubble palette, and are nothing short of fantastic.
From there, he was a man on a mission. For the next several weeks he spent every clear night, from sunset to sunrise, imaging in narrowband. His targets included the Elephant Trunk, the Heart and Soul, the Monkey Head and the PacMan Nebulae. He enjoyed the filters so much that, knowing I’d want mine back, he ordered a set of his own. He’s now shooting Bi-Color and Ha+RGB images, in addition to the three-filter narrowband. He’s not sent out a strictly RGB image in months and, looking at his results, I can’t blame him. Needless to say, we’re quite impressed with the capabilities of a DSLR with these new filters.
My current imaging setup is quite different from Stan’s. I have an SCT with a piggybacked refractor, and although they look turbo with the ADM upgrades I’ve put on them, the optics are still slow. ADM accessories can make set up quick and easy, but they don’t speed up the collection of photons. In either the refractor or SCT, after reducers and flatteners, I’m right at f/6.25. That means my exposures would have to be drastically longer than Stan’s to capture the same signal. One thing I do have to my advantage is a mount that tracks well. I got the gear set up and auto guiding, and decided it was time to test the UHC filter.
The UHC (Ultra High Contrast) filter functions as an all-in-one narrowband filter of sorts when coupled with a DSLR. It passes nearly 100-percent of the O-III and H-beta lines, and over 96-percent of the H-alpha. It blocks nearly the entire remaining visual spectrum, which contains many of the light-pollution wavelengths. I shot the Orion Nebula for a couple of hours with it under a fairly bright Moon, and it did an excellent job of rejecting unwanted light.
But it’s the results of my latest test of the filters that will have the greatest impact on my future imaging. It seems that our clearest nights are typically those where the Moon is exceedingly bright. Like the curse of clouds after purchasing new astronomy equipment, the bright Moon always seems to find me on those dry, cloudless nights. Narrowband imaging gave me hope. In theory, I could image on any clear night as long as I used a narrowband filter and imaged an area of sky reasonably distant from the Moon. I decided that the 6-nm H-alpha filter would be a perfect test, and with a clear forecast and a full Moon approaching, I enacted my plan.
Over a period of two nights, both within 48 hours of the full Moon, I imaged the Horsehead nebula. The Moon was ridiculously bright, and always in the quadrant of sky in which I was imaging. Using the 6-nm Astronomik Clip-Filter and a Canon 60Da attached to my refractor, I had to use ISO 1600 with 20-minute exposures. The shots looked good as they downloaded to the computer, but I was still skeptical. Skyglow gradients often aren’t visible until the image is stacked.
After 4 hours of exposures over those two nights, I shot my darks and flats and processed the image. What I got was amazing. With no filters, I’d never have imaged on such a bright night – not in any part of the sky! The Horsehead Nebula that I captured while imaging with a nearby full Moon was simply stunning. If no other feature of these filters has convinced you yet to try them, the ability to image under a full Moon should. I’ve opened up so many calendar dates for imaging! If only I could get the clouds to participate.
The Astronomik Clip-Filters are excellent. After comparing notes with Stan, we can’t find any reason not to be imaging with them. Whether it’s the narrowband versions, one of the contrast enhancers or just the OWB, you could probably use one of these filters. Now that they’ve been released in the EOS XL format for full-frame cameras, there’s no excuse for a Canon camera that’s been modified for DSLR sstro photography to go without them. They can open new doors into the world of narrowband imaging, or just simplify your daytime use of your astro-modified DSLR. Either way, once you try one, I think you’ll agree it’s the best solution for taking your DSLR imaging to the next level.
 Austin Grant, a high-school Chemistry and Biology teacher, is a self-described perpetual hobbyist, experienced in such areas as building computers and repairing arcade equipment. Austin stumbled into astronomy several years ago and it soon became his primary interest. Being a child of the digital age, it didn’t take long for him to find digital astro-imaging and he sold his last pinball machine to fund his current imaging rig. Austin shares his passion for stargazing with his students.
And to make it easier for you to read more great reviews and get the most extensive telescope and amateur astronomy related news and content that are only available in the magazine pages of Astronomy Technology Today, we are offering a 1 year subscription for only $6! Or, for an even better deal, we are offering 2 years for only $9. Click here to get these deals which only will be available for a very limited time. You can also check out a free sample issue here.