
Vintage SBIG ST Astronomy Camera Review: Over the years, I have been amazed when reading magazine advertisements for astronomical cameras. The year-to-year advances in the quantity, quality, sophistication and automation of available options have been astounding. But, so have increases in overall prices. Yes, there are affordable cameras capable of tremendous images, but the high-end options – those which consistently capture magazine-quality images – cost a lot of bucks, by anyone’s measure.

Like most of you, my sensitivity to sticker shock has declined as prices increased, but advertising a camera that costs over $5000US as “low cost”? Not in my universe!
Over the years, I have been very fortunate to have equipment donated or sold to me under market value, but unfortunately, those are the exceptions, not the rule. Like most of you, I’m always on the lookout for ways to do a quality job on the cheap.
For most astrophotographers I know, even a $1000 camera can be a budget buster. It is challenging enough to save for a telescope and a few nice eyepieces. Add a laptop, a dedicated astrophotography camera, a more capable mount, plus filters, flip mirrors, etc., and we end up with a substantial investment in imaging. If we are married, then the cost doubles, since we are often asked, “I get to spend the same amount that you spent on your new camera, right?” Right.
So, how can we achieve quality imaging in astronomy without selling our children as indentured servants or jeopardizing our retirements?
I opened this article with mention of affordable cameras capable of tremendous images, and I own two: the ZWO120MC (color) and the ZWO120MM (monochrome). These cameras cost less than $300US and are now appearing on the used market for even less. The color camera is primarily good for planetary imaging but can be used for brighter deep-space objects, as well. The monochrome camera can be used for planetary, DSOs or guiding. So far, all good.
Unfortunately, neither ZWO option features a physical shutter or cooling. While it is still possible to execute precise calibrations for science applications, it is also far more complicated – prohibitively so for many. The cooled versions of these to control the mount. cameras (still no physical shutter) move their prices close to that $1000 mark we hope to avoid, so again, how can we do quality imaging on a tight budget?
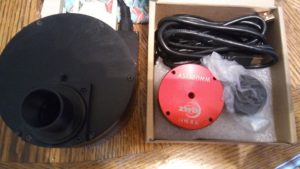
One option is to use old but still-serviceable technology. For this article, we will discuss two old parallel-port CCD cameras: the ST-7E (Image 1) and the ST-8E (Image 2), by the Santa Barbara Instrument Group. SBIG is now owned by Diffraction Limited, which still fully supports these cameras with legacy software and manuals on their website. What makes these solid alternatives for the budget conscience astronomer? Cost, durability and quality.
Cost
On the used market, ST-7Es and ST-8Es go for around $100 to $300US, respectively, a small fraction of the prices of more modern options of similar quality. When the ST-8E camera was introduced in the 1990s, it sold for $5999US – without accessories. The ST-7E was $1999US. Given that both cameras remain as capable today as they were 20 years ago, used versions represent amazing values.
Looking at today’s SBIG ST cameras, an equivalent purchase to a ST-8E is the STX-16803 at $9995. Granted, that $3996 price increase for the modern STX is more than justified by its much larger sensor and faster upload speeds (USB), and its internal guiding chip has a sensor as big as an old ST-7E camera’s, but it is nice to have the option of starting with a no-brainer $300 investment before graduating to one of SBIG’s modern cameras. Ultimately, the new SBIGs give you better images, bigger chips, lower noise and faster uploads, but at a price.
Durability
The ST-E cameras are built like tanks! Made from stout metal, they are rugged and take years of continual, hard use very well. A rogue 120-
mph wind gust picked up my telescope mount, camera and telescope several years ago, hurled it against a fence, broke the mount, and scratched the telescope tube but the ST-7E came through without a ding or mark!
The negative to this durability is weight. The ST-7E is listed as 2.2 pounds but weighs more if a CFW-8 filter wheel and filters are added. This is not a big burden for an 8-inch or larger Schmidt Cassegrain, but some of the smaller refractors or imaging Newtonians will require interesting counter balancing or focus adjustments. A Robo-focus or Moonlite focuser often needs an added external spring to make sure the motor moves the focus throughout the full range due to the weight of the camera. Using an ST-7E on an 8-inch Newtonian reflector also required a large weight sticking out on the opposite side and end of the tube from the camera. But, it still worked.
Quality
Most low-cost cameras do not have the sensitivity, shutter or overall quality of the old ST cameras. Similar quality in a modern camera requires a much larger outlay of cash. Plus, because of the reliability of their electronics and quality of their temperature controls, calibration of the vintage ST cameras can be very accurate. This is handy for those who do science with their equipment.
Negatives?
Using a parallel-port camera is the biggest negative. Few modern computers feature parallel ports, and few of the makers of those that do continue to support the parallel port format. And even if you have a computer with a working parallel port, upload times can be excessive. On an old single-core (Pentium), 32-bit OS (XP Home) desktop computer, the average time to upload a ST-7E 765×510 image on the built-in LPT port was 45 seconds. On a more modern computer setup, it takes around 14 seconds for the same upload. The ST-8E, with a 1534-by-1020 image, takes 67 seconds on the newer computer. A parallel-port camera is obviously not for those who desire a modern, high-speed, plug-it-and-forget-it option, especially since focusing requires a special technique and significantly more time than with a USB camera.
The second big negative is that you must use a 32-bit operating system. This negates much of the power of the multi-core, four-gigabyte-plus computers. 32-bit operating systems can only use three gigabytes of RAM in Windows. So, when you use a multiple-core, high RAM system, you are wasting memory.
The last SBIG driver checker will only support 32-bit systems for a parallel-port model. This is kind of confusing since the name of the program is SBIG 64-bit Driver Checker. For an LPT (parallel-port) camera, it will only load a
32-bit driver for a 32-bit operating system, otherwise it will tell you that it cannot load the drivers. You must also configure the port with this software by scrolling up to LPT1 in the configuration menu. The SBIG 64-bit Driver Checker program can be found on the Diffraction Limited legacy page.
But, this negative is one of the reasons SBIG ST cameras are so affordable! Many do not have the time or interest to try and figure out modern ways around most of these negatives, so these cameras sell for pennies on the dollar of what they would if they used USB systems. Add the ready availability of older, cheaper, but still-serviceable computers, programs and accessories, and the ST parallel port cameras begin to represent a viable alternative for the cost-conscious astronomer who is willing to work harder to capture and process quality data.
What You Need
If you have a laptop or a desktop equipped with a parallel port and Windows XP or 7, and you are set. But, if you want to run the mount and other software, you will sometimes run into memory issues.
My old HP ZE4400 laptop often runs into a problem and drops the camera drivers in the middle of a run.
My first thought was an address issue, but after experimentation, it seemed to be too many things running at the same time for the memory and processor. This old of a computer will only take one- to two-Gb of RAM, max, with a single-core processor.
One solution is to use two computers, one for the camera and one for the mount. Usually though, a desktop unit with more than two GBs of RAM will handle the load, especially if it is a single-core with hyper-threading technology. The way I worked around the memory issue in the old ZE4400 was to eliminate everything but what was needed to run the scope and camera. Still, it would be nice to use a more modern multicore computer.
Enter the Lenovo T60 Windows 7, 32-bit, laptop and docking station (Image 3). I purchased this laptop four years ago on eBay for around $125US. With a further investment of a $30, 500-Gb hard-drive and $21 two-Gb expansion memory, the cost topped out about at $175. But that was four years ago. These units are now down to less than $100US on eBay or Amazon.
The T60 does not have a parallel port, but with a dual-core processor, it has enough processing power to run multiple programs easily. Fortunately, the docking station for the T60 features expansion USB ports, an HDMI port, a VGA port, a serial port, plus a parallel port! The docking station was $18US, shipped from Amazon. This is a used unit, but I could not see any signs of usage at all on the station. It even came with a locking key and works well.
There are other laptop-plus-docking station combinations that will suffice, but you must do a little research first. Whatever you end up with, don’t upgrade to Windows 8 or 10. These later Windows programs no longer support a parallel port. Windows 7 is the last version to include parallel support for electronics that need an LPT. The USB-to-parallel adapters you see online will only work for printers and cannot be used for a parallel port camera.
What about a desktop with a parallel port? Windows XP and a single-core computer with hyper-threading technology ran a system with the ST-7E, plus five software programs to control the mount and camera for two years without any issues. This included auto focusing with a Robo-Focus unit. It continued to run fine when it was upgraded to Windows 7, although it still took upwards of 45 seconds to upload an ST-7E image.
One of the big improvements you make is adding a PCI parallel-port card. If you pay attention the fine print and buy one that comes with software to work with windows XP through 10, 32- bit programs, you can theoretically run it with the newer OS, but I was not able to try this on my 32-bit computers so cannot say these work for sure. My experience is only with XP and 7 on a slower, single-core 32-bit operating system, but the PCI card cuts the ST-7E upload time from 45-plus seconds using the native LPT port, to 14 seconds, even on a single-core desktop. This is still not USB speed, but it helps. Oddly, my old HP laptop uploads the ST-7 images in 17 seconds and the ST-8 images in 67 second, when a desktop, just as old, uploaded much slower.
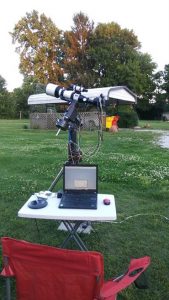
Let’s consider setting up a newer laptop (although setup of a desktop computer would be similar) to control a ST-8E camera and scope. (1) Hook up your laptop power supply to the docking station power port. (2) Seat the laptop on the station. (3) Turn on the laptop using the button on the station. (4) Attach the parallel cable from the camera to the docking station, as well as plug in and connect the separate camera power supply to the camera. (5) Attach the ST-4 guiding cable from the camera to the mount. (6) Attach your USB cable from the mount (or hand controller) to the laptop. A mouse also makes things much easier if you have the USB space. (7) Attach an Xbox game controller (my Sirius mount did not come with a hand controller, so I control the mount with EQASCOM and EQMOD and need a game paddle for easy movement) to control the telescope movement like a hand paddle for professional scopes. The plus with this setup is that you can program in much more functionality than a typical hand controller.
Once everything is fully booted and ready to go, open (in my case) The Sky Pro 6, or one of the numerous other planetarium programs, such as Cartes Du Ciel, that also work in this configuration. ASCOM is used to tie everything together, and you can add a free patch from ASCOM so that your planetarium program runs the mount through the EQASCOM program. Set up the mount through a setup window and then click on connect the telescope.
There are at least three options to control the camera, but the least expensive is CCDOps from SBIG. It is free but offers only basic camera controls. Still, free is always good! Although it may be limited in functionality, it works very well.
If you are lucky enough to receive a licensed version of CCDSoft v5 with your used camera, you will be in great shape. Options for buying it or Maxim DL 5 on the used market vary. In my opinion, CCDSoft is still the best software by which to run a SBIG parallel-port camera. You can also download the legacy drivers and use Maxim DL 5 to control the camera. Some prefer Maxim for parallel-port cameras, but I have found that CCDSoft just seems to be easier for me to use, especially for parallel-port SBIG cameras and the control software.
Once you set up and connect the camera, you have several ways to control it plus a focuser and mount. Software Bisque had an old control program that came with CCDSoft and there are some newer, incredibly flexible but expensive options, as well. For my particular needs, I have found that CCDCommander works very well. It is easy to use and flexible. It is also the cheapest option I know of to control the entire system. In fact, with my telescopes that have a Moonlite or Robo-Focus, it works very well for autofocus, even with multiple filters. The cost is around $100US.
If it takes 14-plus seconds to upload an image with the ST-7E or 67 seconds with the ST-8E, how do you manually focus? In CCDSoft, you take a 1×1-binned image, draw a small box around the star (or stars) you want to focus on, and voila, you can upload very quickly and focus! The typical procedure for CCDSoft is to start the process with a 3×3 bin for the ST-7E and 9×9 for the ST-8E, then focus it as close as you can. This will get you close enough when you switch to a 1×1 bin. You then move to the 1×1 bin and draw a box around the star or stars mentioned above, then focus. My usual procedure is to find two magnitude-7 or -8 stars, and focus them with a two-second exposure.
There are several ways to achieve focus using software in CCDSoft, but my typical method is to zoom to 200 percent in the image and see when the star takes up the fewest pixels. When it does, it is focused. On my more serious scopes I use the built-in focus control with CCDSoft or Maxim DL 5 using Focusmax. I use Focusmax version-3, which is still freeware if you can find it. Version-4 has a cost to it but has enhanced usability. With CCDCommander, auto focus typically works very well. I typically choose a magnitude 4- to 5-magnitude star for the automated routine.
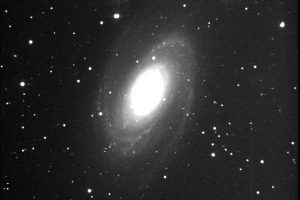
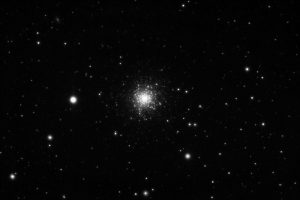
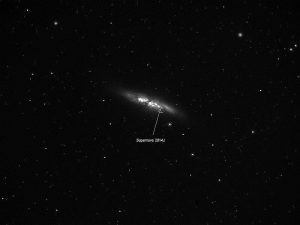
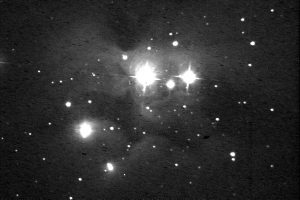
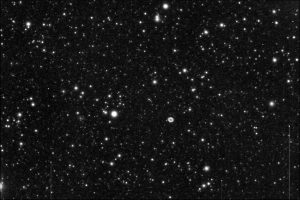
All of this is great, but what do the images look like? Images 4 through 8 are typical examples from my own image archive.
The technology may be old, but the quality and usability are still first-class. These vintage SBIG cameras are a great way to get into serious imaging for pennies on the dollar. Sure, these old cameras are now inferior to their modern iterations, but they can still provide the quality and reliability you need for solid performance at costs that won’t break the bank!
 By Paul Temple
A retired pastor, Paul is currently teaching Earth and Space Science in high school. His observatory, TRO, features 2 robotic telescopes, an 11” Celestron and an 8” Meade LX200. Paul is a speaker for the American Association of Variable Star Observers and has presented papers at Mid- America Regional Astrophysics Conference, AAVSO Conferences and a Poster at the Kepler Science Conference.
And to make it easier for you to get the most extensive telescope and amateur astronomy related news, articles and reviews that are only available in the magazine pages of Astronomy Technology Today, we are offering a 1 year subscription for only $6! Or, for an even better deal, we are offering 2 years for only $9. Click here to get these deals which only will be available for a very limited time. You can also check out a free sample issue here.