
 By Dr. James R. Dire
Dr. James Dire has an M.S. in physics from the University of Central Florida and a M.A. and Ph.D. from The Johns Hopkins University, both in planetary science and is an associate provost at Gardner-Webb University in Boiling Spring, N.C., and a professor of physics and astronomy. He has played a major role in several observatory projects including the Powell Observatory project, which houses a 30″ (0.75 m) Newtonian, rebuilding and installing an 8″ (0.20 m) Alvin Clark refractor in a new observatory built for it at the Naval Academy and was the initial director of the Coast Guard Academy Astronomical Observatory in Stonington, CT, which houses a 20″ (0.51 m) Ritchey-Cretien Cassegrain telescope.
Fifteen years ago, I bought my first Discovery telescope, an 8-inch f/5 Newtonian. The optics were great. The telescope is still in use on my brother’s ranch in the Texas Hill Country. A few year later, I purchased a Discovery 8-inch f/6 Newtonian for my son for his 21st birthday. The larger focal ratio provided virtually coma free viewing.
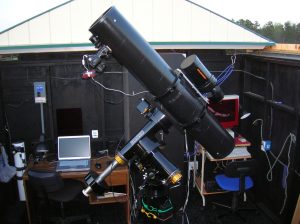
Then in 2005, I purchased a Discovery 8-inch f/7 Premium DHQ Newtonian to use as the main imaging instrument in my backyard observatory (Image 1). Although configured as a Dobsonian, I removed the optical tube assembly (OTA) and mounted the scope on a Parallax HD150 German Equatorial mount using a set of Parallax tube rings.
The optics were contained inside a Sonotube-like tube with a flat back interior finish and a nice glossy black exterior. This material has very low thermal expansion and less flexure than Newtonians made with thin sheet metal tubes.
The four-vane spider, secondary mirror assembly and primary mirror cell were much higher quality than those components in imported 8-inch Newtonians. The only thing that could have been improved was the focuser. Back then the standard focuser was single-speed 1.25-inch rack and pinion focuser. Still I had little difficulty achieving focus for CCD or DSLR imaging.
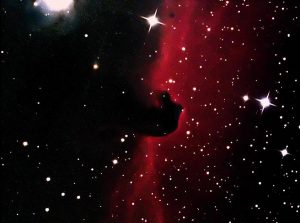 Most of my images with this scope were taken with a Canon 30D DSLR camera or a SBIG ST-2000XCM CCD camera. The focuser handled the weight of either without flexing. Image 2 is a 55 minute prime focus exposure of the Horsehead Nebula (IC434) taken with the 8-inch 1422mm focal length Discovery telescope.
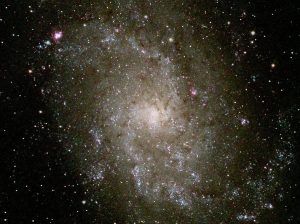
Image 3 is the same configuration with a 25-minute exposure of the Pinwheel Galaxy (M33). Both images demonstrate that high quality images can be obtained with a fairly inexpensive 8-inch Newtonian telescope. At f/7, there is no hint of coma in the images and stars all round out to the edges of the images.
Newtonians are by far much less expensive per inch of aperture to manufacture than any other telescope design. And Newtonians with high quality optics provide exceptional views and images. I am partial to f/6 to f/8
Newtonians since the longer focal lengths yield higher magnification and require smaller secondary mirrors, thus less obstruction of light for the primary.
These middle-of-the-road focal ratios also are better for imaging than optically much slower Cassegrain and catadioptric designs. Discovery still makes the 8-inch f/7 Dobsonian, the smallest aperture in their Premium DHQ line. They now come with a quality 2-inch single-speed focuser. Each scope also comes with a 25-mm Plössl eyepiece, a Telrad finder and tube covers. I don’t think there is a finer production 8-inch Newtonian sold in America!
Recently, I was searching for a permanent telescope for a small domed observatory located on the island of Kauai. My dome is ten feet in diameter and has a 24-inch wide shutter. The dome size was ideal for a 10-12 inch telescope with a small refractor for guiding.
I contacted Discovery Telescopes to see if they would make me a 10-inch f/6 optical tube assembly with a quality 2-inch focuser. I was happy to find out the standard focuser was a JMI EV-3. I opted to pay a little extra and get the JMI EV-1 focuser since it was dual-speed and I could eventually motorize it. I own telescopes with other high quality name-brand focusers, but this focuser is the nicest one I have even used!
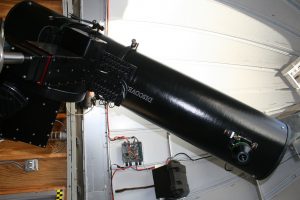
I used another set of Parallax tube rings (thanks Joe) to attach the telescope to a Paramount ME German equatorial drive (Image 4). The length of the tube was perfect giving me six or more inches of clearance away from anything attached to the dome (like the lower shutter motor!)
First light was on the nearly full moon with a 31mm Televue Nagler eyepiece. My friend Tom Ellis and I both agreed it was the finest view of the moon our eyes have ever seen in a telescope. A week later we viewed every Messier object along the Milky Way between M6 and M27 with a couple of side trips to M13, M57 and Omega
Centauri. The views were outstanding. Even with the huge 82° field of view of the 31mm Nagler eyepiece, we saw no hint of coma!
Image 5 shows a close up view of the focuser with this behemoth eyepiece. The focuser only has one setscrew barely visible in the image behind the right side of the eyepiece. But with the compression ring, it firmly holds this heavy eyepiece and my SBIG CCD camera!
There is a course focus knob on the left and a course/fine combination knob on the right. The white graduated ring and brass pointer on the right focus knob make recording focus points easy for quick eyepiece changes. The graduated ring also makes focusing for CCD imaging go much faster. I also observed no focus shift when tightening the lock screw.

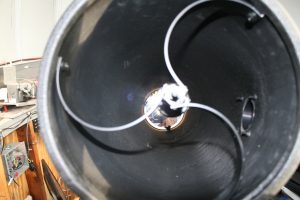
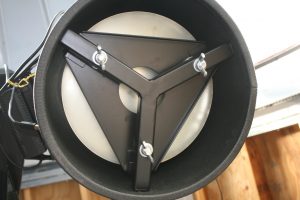
I did not realize until the telescope arrived that it would have curved vanes holding the secondary mirror assembly (Image 6). These vanes completely eliminate star diffraction spike like those seen in Image 2! The primary mirror and mirror cell (Image 7) were not installed in the Optical Tube Assembly during shipping. There were packaged separately with lots of foam wrapping in a smaller box inside the box containing the tube. The primary mirror is 1.5 inches thick and center marked for using a collimation tool.
The primary mirror-secondary mirror separation in the tube was designed so that most eyepieces will focus within the focuser drawtube range. However, as I experienced with my former Discovery 8-inch f/7 telescope, there was not enough back focus for using a camera. This is a common problem with larger focal ratio Newtonians. After measuring the drawtube extension with the 31mm eyepiece in focus, I calculated I would have to move the primary
mirror 1.5 inches closer to the secondary to have enough back focus for CCD imaging.
So, I drilled new holes for the mirror cell (with it removed, of course) 1.5 inches closer to the secondary. After reassembling and collimating the optics, I had the perfect amount of focuser drawtube motion to focus either of the above-mentioned cameras. For visual use, I just install an extender into the focuser before inserting an eyepiece.
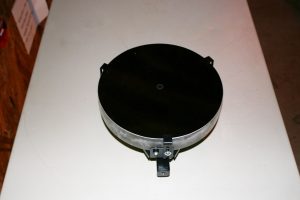
The back of the mirror cell appears in Image 8. The floatation system is simple but rugged. There are three large collimation wing nuts and the springs are heavy duty so that locking bolts are not required in the design.
The telescope holds the collimation quite well. The design provides for ample airflow behind and around the
primary mirror to facilitate cooling. However, since my dome is not air conditioned and the interior temperature typically reaches 90-100 degrees in the late afternoon, I have added a 12V cooling fan behind the mirror cell. If I open the dome at sunset and start cooling the mirror, the mirror reaches ambient temperature by the end of twilight.
After a quick focus check, I am ready for imaging before the background sky is black. With only a 13-degree average diurnal temperature variation on Kauai and a 10 degree summer to winter temperature variation (both in average high and low temperature), I am virtually making no adjustments to the focus position for nightly imaging!
One note of importance is that due to the open design of the rear of the OTA, I have to cover the rear of the tube during imaging. Even the small amount of red light from my power strip switches can ruin an image when incident
on the rear of the mirror.After the mirror is cooled, I just replace the thick black vinyl tube cover over the bottom of the tube.
A computer inside the dome controls the telescope mount, dome shutters, dome rotation, and the cameras. When I start an imaging run, I secure all lights inside the dome and power down the computer monitor. I control the computer in the dome remotely over a LAN from outside the dome so the inside of the dome remains dark and vibration free during imaging.
Discovery Telescopes have been in business since 1991. All telescopes and components are hand crafted in their California facility. Only their eyepieces are imported! hey specialize in Newtonian optics and their Premium DHQ line has 8-inch f/7, 10-inch f/6, 12.5-inch f/5, and 15-inch and 17.5-inch models that can be made f/4.2 or f/5.
These models can be ordered with a split-tube design, meaning the tube can be disassembled into two pieces for easier transport. The three largest sizes mentioned above can be ordered as truss-tube Dobs, too!
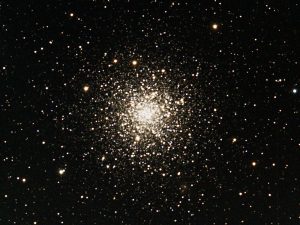
So how does the Discovery 10-inch f/6 PDHQ telescope perform with CCD imaging? During my first night of imaging, the seeing was 2.5 to 3 arcsec, poor for our location. So, I selected a few targets that would turn out okay under those conditions. My first object was the globular cluster M12 (Image 9). Star clusters in the Messier Catalog are easier to image than other deep space objects because they are brighter and require shorter exposures.
This image is a 30-minute exposure using an SBIG ST-2000XCM single shot color CCD camera. The stars are nice and round all the way out to the edge of the image. The colors of the stars are deep, ranging from red to blue, and an uncountable number of stars are resolved. I even picked up a couple faint galaxies at the 5 o’clock position on the edge of the cluster!

My second object was M97, the Owl Nebula (Image 10). The combined exposure was three hours using the same CCD camera. This was the longest exposure I have ever taken of M97 and the longest focal length telescope (1524mm) I have used to image it.
Besides the normally seen blue disk with the two “owl” eyes, I was able to capture the fainter out ring of the nebula, which contains more red emissions. In previous imaging of M97 with smaller telescopes, I was able to capture the three 16th magnitude stars surround on the Owl’s southern eye. In this image I was able to capture two even fainter stars superimposed of the nebula’s northern edge!
Discovery Telescopes makes excellent Dobsonian telescopes with the finest production Newtonian optics made in America. They are excellent for any type of celestial viewing. And as I have demonstrated, the Premium DHQ optical tube assemblies make excellent imaging telescopes at of fraction of the cost of similar sized refractors, or any other reflector design.
###
 The Astronomy Technology Today editorial staff would like to take this opportunity to remind you of the availability of our Solar eclipse equipment guide – The Definitive Equipment Guide to the 2017 Solar Eclipse. Our goal with the 40-page publication is to provide an easy-to-consume introduction to the technological options for viewing and imaging the Great Solar Eclipse. We cover the gamut of options available including building your own solar viewer, solar glasses, smart phones, DSLR cameras, using astronomy telescopes, solar telescopes, using binoculars, solar filters (including a DYI filter option), CCD astro cameras, astro video cameras, webcams and much more. You can view the guide on our website here – its free and there is no requirement to sign up to read the guide.