
Sharing the Cost of Remote Observatory Rental
Remote imaging promises virtually hundreds of clear nights a year under dark skies and excellent seeing – conditions that allow very deep images. Most of us look into imaging at a remote site, take one look at the costs, and assume it cannot happen for us. Well, it can happen. Each member of our group of seven astrophotographers is imaging remotely now and at very reasonable costs. This article describes in detail exactly how we are doing it and how you can, too.
The Challenges of Backyard Imaging
As astro imagers, we start with the best of intentions. We plan to image a lot. We invest in expensive equipment and software, and we build backyard observatories. Then we bump headfirst into the realities of backyard imaging where clouds, light pollution, sky gradients, and marginal seeing can work against us.
Weeknight backyard sessions are also often shortened, because we have to work the next morning. Weekends are often dedicated to family time, leaving precious little for prolonged imaging sessions. Some of us escape to star parties once or twice a year and hope to spend a week camping and imaging under dark skies. Even then, weather remains an unknown.
What started as a quest focused on imaging countless deep-sky objects from the convenience of our backyards can turn instead into a decidedly on-again/off-again part-time affair. Months can go by with valuable equipment sitting idle.
The Solution: Remote Imaging
The answer seems to be that our primary imaging setups shouldn’t be in our backyards. Better they should be elsewhere – where the skies are always dark, the seeing is always steady, and clouds are rarely in the way. We dream of setting up our telescopes where the quality of night skies is the only location factor, not influenced by the many other factors that dictate where we live. Ideally, we’d live where we want without regard to night-sky conditions and yet still locate our telescopes in ideal places. Remote imaging fulfills both goals.
Remote-Imaging Options
We live in good times for astro imagers. Many of us already have most of the equipment and software we need to capture and process extraordinary astro images. Our problem is instead the cost of deploying those tools where they will do us the most good. Accessing our equipment remotely is often the answer, and a quick look at remote imaging finds three primary paths.
The first option is to rent time on a commercial telescope. Costs vary, but time on such research-grade systems is expensive. The second option is to build our own observatories on purchased or rented dark sites – expensive, again.
The third possibility is to lease a commercial pier in a full-service remote facility. The pricing of that option is also not for the faint of heart.
Like renting time on a commercial telescope, the third option, renting a remote commercial pier is also priced with professionals in mind, not solo hobbyists – especially solo hobbyists with limited budgets. Nevertheless, there are many positive sides to leasing a commercial pier.
Leasing a Commercial Pier
Although on initial impression this option might also seem expensive, it provides everything you need except your equipment and software. You can expect the site to provide Internet connectivity and electrical power.
There will be an existing observatory that is already automated and tested. You can also expect cloud sensors, web cams, and weather information. Often, there are seeing monitors and sky cams, and there will usually be someone either on site or close by who can help with simple hardware issues. These sites will have gone to great lengths to choose a location that provides excellent seeing, dark skies, and good weather. As a renter of a pier location, you are spared all the large set-up costs of a from-scratch premium observatory.
Sharing the Costs of Remote Imaging
As with any astrophotographer considering remote imaging, the major obstacle faced by each member of my imaging
group was the cost of setting up and maintaining an individual imaging system at a remote commercial pier. Prices vary because lease terms are generally negotiated on a case-by-case basis. In response to those costs, two of us decided to see if it was possible to “go remote” on a budget – at a price reasonable for hobbyists. We reasoned that we could minimize individual costs by sharing the major expenses among multiple imagers.
There are decisions and compromises that must be made in a project that involves a group of amateur astrophotographers sharing a single telescope. We attempted to identify all significant issues beforehand and to put in place workable and satisfactory solutions. We wanted to minimize the compromises and maximize the cost savings. One of us had been involved in a telescope sharing project before. His experience helped shape our plans. We recruited several other interested hobbyists and set up a year-long pilot project.
Our pilot plan was simple enough. We’d lease a pier for one year and share access and costs between six to eight members. A smaller group and the per-member costs would still be significant. On the other hand, adding even more members would present increasingly complex group dynamics. Still, each additional member increased the per-member cost benefit. We concluded that six to eight members would provide the optimum balance between
manageable group dynamics versus per-member cost.
We also realized that our members could be anywhere. Indeed, our current group now has a total of seven members – five in the U.S., one in the U.K., and one in Australia. We established key group policies well in advance of any payment, so every member knew exactly how things would be run before deciding to commit. Once a potential member had agreed to join the project, he became a participant in further decisions.
Strength in Numbers
There are other advantages to having a group. As problems crop up with software, we no longer face them alone – there’s a lot of experience and expertise among our members. When we need answers, there are seven intelligent, motivated people looking for the solution instead of just the one. Most of us are experienced with the software, but when an odd setting issue crops up, one or two members are likely to have run across it before.
Similarly, when it comes to processing, there are often very helpful suggestions from our more experienced members. There is indeed strength in numbers. Each member brings to the group a unique set of skills, insights, and experience.
Managing Project Finances
From the beginning, we wanted to avoid issues of billing. We approached this by requiring that each partner pay the
full amount for the year up front. We did not move forward until we had received payment from everyone involved. This ensured that each partner was committed for the full year. No one would drop out part way through, leaving the others to bear higher per-member expenses. It also meant that the pier-lease expense was fully covered before the lease was signed.
Our year-long project would start and end with the dates of the pier lease. We put one member in charge of the money for the group. Any unused money at the end of the project would be returned evenly.
Automating Imaging Runs
Early on, we decided we wanted to use every available minute of dark time. Many of us work, so we’d rely heavily on automation software. We already had licenses for CCDAutopilot and, as a group, we also purchased a license for ACP and Scheduler. These are “super programs” that run all the other software and hardware necessary for imaging. We’d set up the imaging sequences ahead of time, then allow the computer to run the telescope and automatically acquire our images.
This is efficient, because all steps proceed at machine speeds – there’s no dead time. Overall images are better, because no corners are cut by fatigued imagers in the wee hours. We could image every night, all night, and not deprive anyone of sleep.
Allocating Imaging Time
Another issue to address was allocation of telescope time. We initially thought that time should be divided evenly, but we soon realized this would not work for us in night-to-night practice. If each person was to have exclusive use of the telescope, then any one member would only have it for one-seventh of the total time. If the time was divided in that manner, then a month of 30 days would give us just four and a half nights each. Our goal was to share all the benefits of having a remote telescope but only pay a fraction of the cost, so clearly, a fractional-use model wouldn’t work for us.
So, we chose to share all data instead. Every member would have every frame of data collected. The raw data from the telescope would belong to the group. Once an image was processed, that processed image belonged solely to the member who’d processed it and could be used in any way he pleased.
Managing the Software
The issue of managing the software setup was next. There are countless potential software settings. All are important, but there are many individual choices and much room for personal preferences. We didn’t want to have several people making potentially conflicting configuration changes. For that reason, we chose one experienced member to be in charge of interacting with the telescope and the software. The group could weigh in – and usually did – but it was up to that one member to make software changes and to keep track of them. This worked out well for us.
Managing Target Parameters
The next issue was how to choose targets. As with software management, we addressed this by nominating one member to set up targets. Each target would be set up just one way so that all frames would be stackable. We wanted to avoid the situation where several people shoot frames for the same target, and each person frames it differently, uses a different guide star, uses varying exposure lengths, and differing rotation angles.
With one person setting up a target and by standardizing the exposure length for the target, all the data would be useable. Every member of the group was encouraged to submit targets. If a member wanted a target framed a particular way, it would be set up that way. From then on, all frames would be compatible.
We decided we’d like 20 frames per filter, and with rare exception, we would not bin data. In general, we shoot 15-minute frames for LRGB and 30-minutes frames for the narrow-bands. Each target is different, of course, but where possible, we’d try for the standardized exposure length. We also chose a single temperature for the camera: -20C.
Selecting Equipment
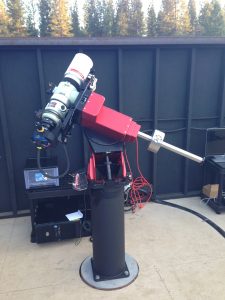
As far as equipment went, the individuals in our group owned a nice selection. From that collection, we chose a Paramount ME, a Takahashi FSQ106EDX with a Takometer rotator, and a QSI683WSG camera with Astrodon generation II LRGB filters and 5-nm Astrodon narrow-band filters (Image 1). For the remaining filter slot in the eight-position disk, we installed a 5-nm near-red filter.
We also installed a Lodestar guider camera. For longer focal lengths, we used an Astro-Tech 10-inch uncorrected R-C with a Pyxis rotator. One of our members configured a computer for the remote site. As a group, we purchased a UPS, a 24-inch Bisque steel pier, a Pyxis rotator, and an IP switch with eight outlets.
Between us, we had licenses for almost all the software we needed. As mentioned, we also purchase ACP and Scheduler from DC3 Dreams. Since one member’s only mount went to the remote site, he no longer had an imaging system at home. His licenses could therefore be used on the shared system, so we did not need to purchase additional licenses.
Distributing Image Data
Next, we needed a data-distribution system. We chose to use Google Drive. The advantage over similar systems was that we could designate the remote computer’s drive as read-only as far as data syncing is concerned. This eliminates the issue of someone making a change to a file on their home computer, then having that change synced back to our main Google Drive.
Our members would get all the files as they were collected but couldn’t accidentally make changes. If a home computer is off, the data is synced when that computer is next connected. If the computer is connected as data is collected, the file appears on the home system within about six seconds of being written to the remote disk. Since the data automatically goes to and is distributed from the “Cloud,” there are no issues with individuals tying up bandwidth at the remote site.
Onsite Repairs
We have two members who live within a few hours driving distance of the remote site so can make the trip if necessary. In addition, the site has an employee who lives close by and can drive in to check a cable or make a change while we talk to him over the phone. The other members in our group are thousands of miles away, and two are on other continents.
More Data Is Better Data
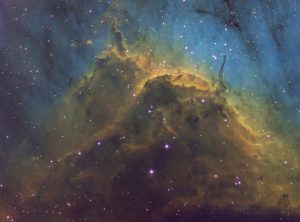
The seeing at the leased pier is generally about 1.0 arc second. We have no problems with light pollution, and the site enjoys over 230 clear nights per year. We do sky flats in the evenings and in the mornings.
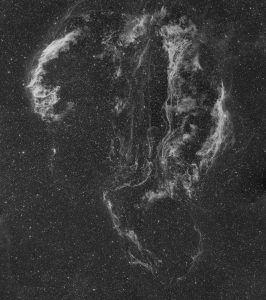
Our imaging runs are set up early, then the system collects data each night. Since the telescope images all night on every clear night, we have no problems devoting large amounts of dark time to each target. Whereas before I’d collect four to six hours of data per target, now I have 20 hours. Where narrow-band exposure is appropriate, we routinely collect 10 hours per filter. For a future six-frame mosaic of the Veil, we’ll collect 180 hours of narrow-band and then LRGB, as well.
Future imaging projects include a nine-frame mosaic of an extremely dim object. For that, we’ll again get well over 100 hours of narrow-band data. With maximum imaging time night after night, we can get much more data than we’d get at home. Since it is all dark-sky data, the images are much easier to process than typical images collected from home.
Per-Member Costs
I started this article with a discussion of costs, so I’ll share those with you now. Pier-lease arrangements are negotiated individually and are private, so we’ll need to speak in generalities. For this discussion, we’ll make up a hypothetical commercial site. We’ll assume a group of eight people, and we’ll assume a negotiated pier-rental fee of $1000 per month, leased for a year. The per-person cost for eight partners is $125 per month or $1500 for a year. It works out to $4.11 per night or about $6.50 per clear night per member, and it is likely costs can be reduced further.
There’s No Going Back
Now we’re getting the data we envisioned when we started. We have few worries about weather, and we have dark skies. We image nearly every night – all night. Our imaging runs don’t even interfere with family time. Personally, I don’t imagine I will ever go back to backyard suburban imaging. So, if you dream of the best imaging has to offer, I encourage you to form groups and go remote. You’ll never look back.
By David Ellison:
 David Ellison is a retired anesthesiologist who lives with his patient wife of 27 years, and an old gassy dog. He’s an amateur machinist, an advanced woodworker, and he runs the “Astronomy Hacks” user group on Yahoo. David has a small home observatory in Chattanooga, TN, and travels to star parties for dark site imaging. He uses his photographs to introduce younger people to astronomy.
###
 And to make it easier for you to get the most extensive telescope and amateur astronomy related news, articles and reviews that are only available in the magazine pages of Astronomy Technology Today, we are offering a 1 year subscription for only $6! Or, for an even better deal, we are offering 2 years for only $9. Click here to get these deals which only will be available for a very limited time. You can also check out a free sample issue here.