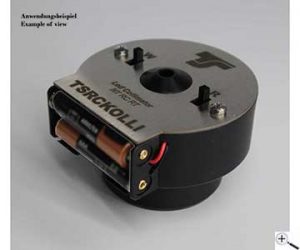
The TS-Optics 2″ LED Collimator for RC Telescopes is compatible with almost all popular optical systems and allows for a collimation at daylight. TS-Optics recommends the collimator for all Cassegrain-like telescopes like Schmidt-Cassegrain, RC, Dall-Kirkham and similar telescope types. The collimator is very precise and the result of the collimation is mostly independent of tilting.
 Collimation of Ritchey-Chrétien telescopes and similar systems
As the TS-Optics team notes, “It is well known that collimating an RC is not an easy thing. Usually, nighttime use on a star is necessary. With the TS collimator, it is possible to obtain an ideal collimation result at daylight. With this, there is always an optimally collimated RC telescope at your hand at night. At the same time, collimation is easy and can be done by anyone. But it is important that the secondary mirror of your telescope has a central mark.”
Here are the TS-Optics team instructions on using the collimator:
Place the optical tube on a table or move the telescope on the mount into a horizontal position. It is helpful to aim the telescope at a homogeneous bright surface (paper, house wall, …). Put the collimator into the 2″ receptacle of your focuser. It helps when you direct the labelling to the collimation screws, this makes working easier. Press your hand slightly from the backside against the collimator. Now you are ensured that the collimator is optimally placed in the focuser. Now tighten the locking screws slightly. Next, switch on the collimator in Newtonian/reflector mode (red LEDs). Now look through the hole.

If the image looks like Image 1, you can stop the collimation process, your telescope is optimally adjusted and ready for the night. But if the image does not look centrically, you should begin with the collimation for achieving the optimal result with the telescope.
Step 1 – adjusting the secondary mirror:
Adjust the secondary mirror with the collimation screws until the central mark of your secondary mirror is exactly in the center. You can directly see any deviation which you then can easily get rid of by adjusting. Make sure that the counter screws (if existing) are loosened before and that the secondary mirror is not loose after collimation.

The result at the end of this step of the collimation should look like Image 2.
Step 2 – adjusting the primary mirror:
Now you center the outer ring by adjusting the primary mirror. Make sure the counter screws are loosened here, too. Untighten the counter screws only minimal, then adjust the primary mirror and then retighten the counter screws. This procedure prevents that the pressure on the cell gets too strong or that something loosens completely. Also don´t overtighten the counter screws. The result at the end of this second and last step of the collimation should look like Image 3. Collimation is finished and the telescope is ready for the night.

RC telescopes with tilting mechanism at the focuser
TS-Optics also points out, “Many Ritchey-Chrétien telescopes have a third collimation possibility – tilting the focuser. It is often tried to compensate a bad collimation with this tilting, but that does not work well. For this reason, you should adjust the tilting mechanism until it reaches the position stop before collimation. Thus it is ensured that the optics is optimally adjusted to the focuser. The tilting mechanism should be used for adapting the camera sensor optimally to the telescope. Thus you can compensate a minimally skewed position of the sensor or a slight tilt of the focuser.”
You can learn more about the TS Optics 2″ LED Collimator for RC Telescopes here.
 And to make it easier for you to get the most extensive news, articles and reviews that are only available in the magazine pages of Astronomy Technology Today, we are offering a 1 year magazine subscription for only $6! Or, for an even better deal, we are offering 2 years for only $9. Click here to get these deals which only will be available for a very limited time. You can also check out a free sample issue here.

