
Editor’s Note: In his Astronomik visual filter review Matt Harmston does a deep dive into using Astronomik Filters for visual observing under light polluted skies. This article originally appeared in Astronomy Technology Today Issue 9, 2020. This article has been updated with new testing notes and can be found here.
Over the years, I’ve shared the eyepiece with family, friends, and myriad others. Telescopes so often capture the attention of onlookers, don’t they? Regardless of attention garnered, interested onlookers often don’t consider getting a telescope because they find themselves within the pale confines of light-polluted skies.
While light pollution interferes with visual astronomy, all is not lost. Many outdoor lights glow due to excitement of such elements as mercury, sodium, etc. Effects from such lighting can be blocked in order to reveal deep sky wonders.
This article is going to describe experiences under light-polluted skies using Astronomik’s 1.25” UHC, UHC-E, and CLS filters along with the absence of a filter. A follow-up article is being penned that discusses use of these filters as observing tools under dark skies.
Filters and the Passage of Light
 Deep sky objects (or, DSOs) emit and/or reflect light along the electromagnetic spectrum. As a result, visible details will vary as a function of wavelengths being allowed to pass to your eye. Filters permit users to emphasize select wavelengths over others, thereby revealing specific details by limiting passage of unwanted light.
To use an analogy, we might enjoy eating a bite of salad – a pleasing blend of tastes arising from a multitude of vegetables and toppings. Deep sky objects are like this salad in that unfiltered views provide a pleasing blend of detail across all visible wavelengths.
Using a filter to isolate wavelengths of light is like pulling an individual tomato or slice of cucumber from that salad: A specific flavor, selected for attention in relative absence of competing options. You might say that filters help us tailor the view to emphasize our desired “flavors”.
Technical Details: Astronomik Filters
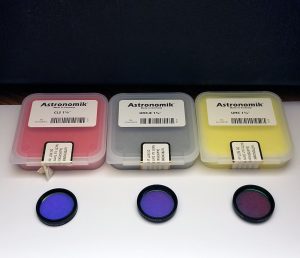
For this article, I used Astronomik CLS, UHC-E, and UHC filters (see Image 1).
The purpose of these filters is to enhance visibility of deep sky objects by increasing their contrast with the background sky. Contrast is enhanced by limiting passage of unwanted wavelengths of light while permitting desirable ones (i.e., your selected “flavor”) to pass through nearly unimpeded.
Though a given DSO might appear brighter when using a filter, this is an illusion. Filters do not brighten objects. Rather, improved visibility is due to enhanced contrast between DSOs and the background sky.
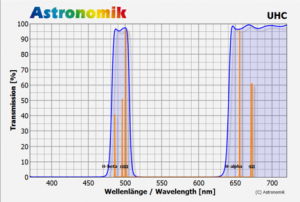
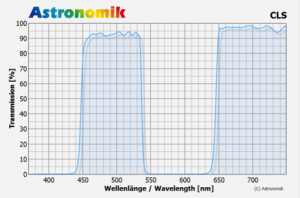
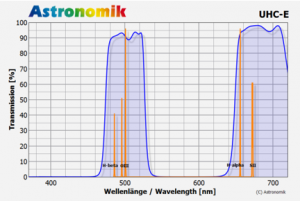
Under the dark of night, a typical human eye might detect light with wavelengths ranging from about 400 to around 600 nanometers, a truncated upper range compared to daylight conditions. To illustrate light passage by filters along this spectrum, Astronomik publishes charts for each filter that juxtapose percent of light transmitted with wavelength (see Images 2 – 4).
Each graph’s elevated regions represent wavelengths where most of the light is allowed to pass. In contrast, the low-lying areas represent wavelengths being blocked by the filters. For instance, sodium vapor lights shine at a wavelength of 589nm, a point where virtually no light passes through any of the three filters.
The CLS filter is a budget-friendly filter intended to block out light from mercury and sodium-vapor lamps while permitting relatively larger portions of the visible spectrum to pass through. The UHC-E filter is also budget-friendly, yet is designed to further enhance contrast of emission nebulae and comets by blocking airglow and common artificial lighting.
With the UHC, blockage of select wavelengths is even more aggressive. Where desired light is passed, the UHC is also the most efficient of the three filters. The UHC is particularly adept at transmitting Hydrogen-beta and Oxygen-III lines while aggressively blocking background sky.
Because progression from the UHC to the CLS filter means passing additional wavelengths of light, overall fields of view will appear brighter with the CLS than the UHC-E and UHC. But, brighter isn’t always better with filters: Contrast is key.
Technical Details: Observing Site and Gear
 Light-pollution testing was conducted at a friend’s suburban home under smoke-filled skies, ample man-made light pollution, and on one of the nights, a 31% illuminated moon.
Judging by the faintest visible naked-eye stars (my night vision is excellent, and corrected acuity is better than 20/20), lower altitudes were limited to roughly magnitude 2.9 and brighter stars. At zenith, I couldn’t make out stars fainter than roughly magnitude 3.9. The 3.9 estimate was obtained after the moon had set on the first night, and replicated under no moon the second night. Direct light from street lamps was blocked by homes, but neighboring lights cast some illumination across the yard.
I wanted to use a telescope and mount fairly typical of what might be found in the amateur community, thus my SkyWatcher Pro 100ED refractor (100mm aperture) and Celestron AVX mount went out for a night on the town. Though the AVX is a GoTo mount, I did not use that functionality so as to more readily use star-hopping and sky panning in my testing of the filters.
In spite of keeping mechanics and aperture fairly basic, I wanted to avoid eyepiece aberrations while testing. Thus, the f/9 telescope was paired with two quality eyepieces: An Orion 22mm Lanthenum Superwide and a 13mm Tele Vue DeLite. These eyepieces were chosen because they are good quality, have comparable apparent fields of view, long eye-relief, and their disparate focal lengths enabled brightness-impacting differences in magnification.
Targets for the testing included Messiers 8, 13, 17, 20, and 57, along with NGC 869/884. These were chosen for several reasons. They could all be detected with the small scope without a filter under my bright skies. And, they represented varied ratios of emission nebulosity- and stellar-sourced light output. Finally, their altitudes resulted in piercing varied levels of light pollution.
The View: Light-Polluted, Smoky, (Sometimes) Moonlit Skies
To test each filter, I alternated between the unfiltered and filtered conditions and then, in some cases, across eyepieces. For high-level details, a summary of observations follows:
– All three filters enhanced contrast to varying degrees, thus detection of and detail within deep sky objects was enhanced by using the filters in most cases.
– The already sharp focus of the unfiltered ED refractor was maintained or improved upon by use of each filter. The UHC rendered stars sharper than any other condition.
– When viewing bright emission regions of nebulae, increased filter contrast progressively enhanced detection and detail regardless of eyepiece or object elevation. In order of most emission detail to least: UHC, UHC-E, CLS, and finally, no filter.
– The UHC filter provided a particularly pleasing 3-d effect when viewing emission portions of M8. And, it revealed far more nebular detail than any of the other filters, eliciting a muttered, “Wow!”. M17 was quite remarkable due to dramatic improvement in observable detail with the UHC.
– If you are panning light-polluted skies in search of targets, the use of any of these filters would be beneficial. M17 was difficult to distinguish from the unfiltered background sky, and was more obvious against the darker background from the CLS. However, the UHC-E and UHC filters more readily extracted emission nebulae from the sky’s soup when star-hopping toward it.
– If you want to star-hop to emission nebulae with a small telescope, the UHC-E gets highest kudos because it markedly increases contrast yet cuts less starlight than the UHC.
– A general point to mention: All other things equal, higher magnification can help with detecting fine details under filtered and unfiltered conditions – to a point. Too much magnification relative to aperture can be counterproductive due to dimming the field of view, among other factors.
– Heavily populated star fields such as the Perseus Double Cluster (i.e., NGC 869/NGC 884) most benefited from the CLS filter. It’s moderate background darkening, combined with greater maintenance of star illumination, made for an eye-catching view.
When considering which filter would get the gold star as a general-purpose accessory, I found myself in a quandary. I kept coming back to the phrase, “different filters for different flavors”.
As a general-purpose filter, I most often found myself preferring the UHC-E – plenty of starlight for the small aperture, darkened background, and enhanced views of more targets of most interest to me. However, if my interest had been specifically in emphasizing views of brighter emission nebulae with this small ‘scope, the UHC would have been my preferred accessory.
Note, “brighter emission nebulae” is a relative label, as larger apertures will reveal increasingly fainter objects and detail than my little refractor. Had my interest been specifically in star fields/clusters, the CLS would have been my choice. In short, each filter had its own application where it stood above the rest, making selection of the best filter a personal choice based on conditions, equipment, and interests.
There are two important limitations to this article. First, the combination of aperture, sky, and location pushed accessible galactic targets below my visibility threshold and/or behind the neighbor’s trees. The second limitation was that there were few examples of accessible reflection nebulae, and even the most obvious (a portion of M20) was barely visible in direct vision. Thus, evaluation of use with galaxies and more thorough study of reflection nebulae will have to take place under darker, more open skies.
Other Filter Characteristics Beyond the Eyepiece
Though the emphasis in this article is on the eyepiece view, there are some important observations to consider beyond contrasty views:
– The filters are accurately advertised as being parfocal.
– All three filters threaded into the Orion and Tele Vue 1.25” eyepieces, permitting full, secure seating in all cases.
– The filters had secure lenses within their respective housings. No tightening of set rings was needed before, during, nor after use in temperatures ranging from 60F to 83F.
– Astronomik website references coating and construction durability. I can embarrassingly attest to this, as one dark sky session saw sweaty fingers drop the UHC filter lens-down on a coarse gravel driveway. Short of my bruised ego and utterance of something best left unprinted, no apparent harm came from the drop. Suffice to say, the filters must be cared for just as any other fine optics, but this (un)happy accident underscored the durability claim.
In the End
Viewing under light-polluted skies may not be ideal, but for many, doing so cannot be easily avoided. Testing these filters reinforced my opinion that light pollution need not preclude exploring the heavens. Instead, we can successfully seek out a wide range of celestial targets.
So, are filters for you? If so, which one(s)? Arriving at this decision involves personal tastes, interests, gear, and settings. But, like myriad eyepieces in their cases, there are filters to suit most needs and interests.
I encourage you to take the plunge and counter light pollution with filtered viewing. These filters from Astronomik put a smile on my face, each in their own way. You just might have the same experience.
###
 Matt Harmston is an educational researcher whose appetite for the heavens has been whetted by increasing aperture over the years. More recently, Matt has immersed himself in video astronomy – a means of probing deeper into the night sky while making astronomy accessible to all ages and abilities. With this technology readily available, Matt is considering a career as a sleep-deprivation research subject.
And to make it easier for you to get the most extensive news, articles and reviews that are only available in the magazine pages of Astronomy Technology Today, we are offering a 1 year magazine subscription for only $6! Or, for an even better deal, we are offering 2 years for only $9. Click here to get these deals which only will be available for a very limited time. You can also check out a free sample issue here.