
Apparent magnitude is something that every beginning and experienced telescope owner has to consider. I sometimes reminisce about my first telescope, an entry-level 115mm reflector. My family let me pick out (but not touch) the scope and assorted accessories well before Christmas, a holiday that rapidly became an eggnog-induced flurry of unmitigated wrapping paper mayhem.
When clear skies eventually put the new scope curse behind me, I eagerly trained the scope toward the rising Virgo galaxy cluster, revealing a few faint, misty smudges bearing zero resemblance to anything I had anticipated. In theory, many more galaxies were bright enough to see with the scope, yet they remained frustratingly elusive.
And, the few that revealed themselves looked nothing like the island universes gracing pages of glossy publications over which I obsessed. For those of you fairly new to pursuit of these faint fuzzies, this article is intended to share information regarding object visibility that might help you avoid my early frustrations.
How bright is that object in my eyepiece?
Apparent magnitude is a measure of an object’s brightness as seen overhead from the surface of Earth. For every point change in magnitude, objects will appear 2.512 times fainter or brighter. For instance, when we gaze upon the star Vega, it shines with apparent magnitude 0.0. On the other hand, the sun blazes through a clear summer’s sky approaching magnitude –27 (yes, negative 27). If you dig into the formulas, the sun appears nearly 2.51227 – or roughly 63 billion – times brighter than Vega under clear, transparent skies.
As we move toward the positive side of the scale, higher magnitudes correspond with increasingly fainter objects. For instance, Polaris shines at about magnitude 2.0, and Neptune is currently about six magnitudes fainter at 8.0. By applying the formulas once again, Neptune appears roughly 2.5126 (251) times fainter than Polaris.
General estimates suggested that my first scope’s faintest viable targets should have been around magnitude 14, referred to as limiting visual magnitude (LVM). Given more than 30 member galaxies with apparent magnitudes brighter than my scope’s LVM, what might have contributed to my disappointing early explorations in Virgo?
Tools that help set viewing expectations
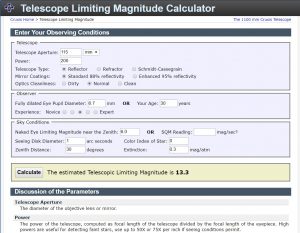
LVM estimates are impacted by multiple parameters, hence my earlier reference to “general estimates”. To better understand the impact of some of these parameters, there are helpful LVM calculators available online. The tool seen in Image 1 enables you to alter different parameters and observe how each affects your LVM. It is helpful that the webpage on which the tool is mounted also describes the parameters in some detail.
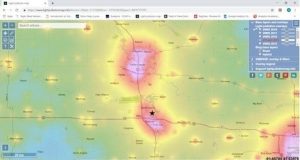
Advertised LVM estimates often assume a view under clear, dark skies looking straight up – a best-case scenario. While my viewing now takes place under rural, magnitude 6+ skies, my first views of a rising Virgo Cluster were significantly hampered given that observing site’s immersion within a substantial light pollution dome (note the black star in Image 2 taken from the Light Polution Info website).
Light pollution – natural or man-made – will wash out faint objects, interfering with our ability to see them. We may not have control over a community’s light output, but we can certainly seek out darker skies guided by such light pollution maps.
Viewing of faint objects also benefits from clear skies. It is important to bear in mind that an absence of obvious cloud cover doesn’t necessarily mean a clear sky. Anything in the air – smoke, haze, dust from harvest – reduces transparency, creating a veil blocking some of
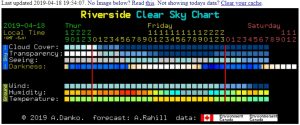
your target’s light. Though everything cannot be forecast with 100% certainty, I find the Clear Sky Chart (Image 3) to typically be quite reliable in forecasting cloud cover, transparency, and seeing, among other details.
To use the Clear Sky Chart, find a location close to where you are (or create your own entry) and apply what you see to planning your evening’s viewing. There are other sky quality tools out there as well, but I’ve been successfully using the CSC for many years – and you know what they say about old dogs and new tricks.
Other considerations and actions for viewing faint objects
An important point to consider is that objects of similar apparent magnitude may differ in our ability to see them due to differences in surface brightness. More extended objects such as galaxies and nebulae spread their light out across a larger area than do stars. Consider a pinpoint magnitude 13.0 star and a misty-patch magnitude 13.0 galaxy. As is, both are near the LVM of my 100mm refractor. However, the star would appear markedly brighter and be more readily visible because, all other things equal, compact light sources are more readily detected than extended ones.
One of the simplest practices that facilitates seeing faint objects is to permit dark adaptation of your eyes. It may take up to 30 minutes after leaving a bright space, but your eyes will become progressively more sensitive to low light – and patience is indeed of value. A useful tip: Many astronomers use red lights at night to help preserve dark adaptation.
Another solution is to increase magnification – to a point. Higher magnification darkens the background sky and will shrink your eyepiece’s exit pupil, the net result being that fainter objects become more noticeable. I emphasize to a point because background sky and exit pupil impacts have to be considered along with reduction in actual image brightness from increased magnification.
You see, for every doubling of magnification, image brightness will decrease by four times. So, increasing magnification may help to an extent, but there is a point of diminishing returns. In the end, your ideal magnification with your gear may require some experimentation – but that discovery can be enlightening in-and-of itself.
If dialing in optimal magnification is not part of your observing plan, another effective practice is to look a little bit off-center from where your object is located in the field of view. The direction of gaze shift varies from person to person, but I find looking slightly above-right of the target object in the eyepiece to reveal additional faint detail. While finding your visual sweet spot requires some trial and error, I’d argue that the worst trial and error at the eyepiece is still better than not viewing at all.
If you find faint fuzzies to be masked by man-made light pollution, the pollution can be mitigated to a degree by adding a light pollution filter to your eyepiece or camera. That said, there are many different filter designs and brands targeting a wide range of lighting conditions and observer goals.
With the diversity of filters now available, I can only recommend researching filter types/brands for your specific needs, and ideally, observe with others using different filters. Filters won’t fix all that ails us – light pollution is still detrimental in most viewing applications. But, you might derive some benefit from filters depending on your specific needs.
Some astronomers go after ever-fainter objects by using progressively larger telescopes. This practice can bring about a condition called “aperture fever”, an expensive malady known to leave permanent smiles on astronomers’ faces. All other things equal, larger scopes permit seeing fainter objects.
For instance, by applying my usual observing parameters, the estimated LVM for a four-inch reflector is 13.2. The same parameters would result in an estimate of 16.5 as the LVM for a 32-inch reflector. Thus, the 32-inch scope reveals objects nearly 21 (2.5123.3) times fainter than can be observed in the small scope simply by virtue of greater aperture.
Another solution for improving your ability to see faint objects/details is to employ imaging devices. For example, video astronomy enables you to vary exposure times, gain settings, etc., and having their result quickly rendered onscreen. Longer exposures enable your camera sensor to capture more light, similar to a bucket collecting additional drops of rain the longer it is left outside. Similarly, increasing gain will increase the degree to which digital information is amplified when passed from your camera sensor to your monitor, the net effect being a brighter image.
To provide a sense of the degree to which astronomical video cameras can deepen your view, Image 4 represents an example from my 100mm SkyWatcher ProED and MallinCam DS-10c camera using 25-second exposures (see tagline for image details). Note, this image has been severely cropped and subsequently resized from the original.
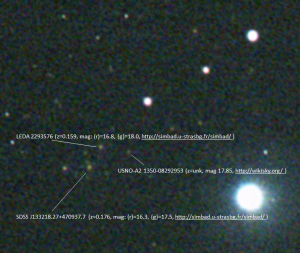
The image is an aggressively cropped image of galaxy cluster [SPD2011] 16769 in Canes Venatici. This cluster has an overall redshift of 0.1601 (per this resource). The image was created from 15 frames live-stacked, each exposed for 25 seconds using maximum slider gain, high conversion gain, and 2×2 binning in a 100mm SkyWatcher ED Pro refractor (at f/9) and MallinCam DS10c camera. To more easily locate the cluster, the bright star at lower-right is 7th magnitude HD 117815.
Under my typical viewing conditions, the 100mm refractor has an estimated LVM of about 13.4, slightly fainter than the 4” reflector example above. Though I annotated only three of multiple identifiable galaxies in Image 4, USNO-A2 1350-08292953 provides an example of video astronomy’s ability to “go deep”. According to http://wikisky.org/, this distant galaxy’s apparent magnitude is 17.85. The cluster in which it resides is over two billion light-years away – not bad for a live viewing session.
Admittedly, I thoroughly enjoy video astronomy. However, there is an important point to bear in mind should you wish to view on a monitor: The light from an un-shrouded or ill-placed computer monitor can wreak havoc on others’ dark adaptation. Thus, be aware of setting up in a manner so as to avoid interfering with others’ viewing. I’ve heard dark legends of seething masses chasing careless monitor users around the viewing field, brandishing pitchforks, flaming torches, and hard-cover star charts (OK, I am clearly exaggerating, but you get the point).
What does all of this mean?
While this article might seem rather dense, consider this:
1- Eyepiece views rarely match modern advertising and magazine imagery;
2 – Many factors interact to impact object visibility;
3 – Many online tools are available to help us set reasonable expectations for viewing;
4 – Some factors affecting what we can see are within our control (some without additional expense);
5 – When frustrated by what you cannot see, don’t give up. A bit of research, experience, and/or reaching out to more experienced astronomers for advice can reveal valuable insights.
Beginning the journey as an amateur astronomer doesn’t require aspirations of Nobel Prize winnings, nor purchase of fancy gear. Rather, the pursuit is a way to explore the universe on your own terms. Scope or no scope, monster aperture or tiny glass, electronic enhancement or au naturale – just get out there and enjoy the night sky. On any given night, you never know how your soul may be touched.
By Matt Harmston

Matt Harmston is an educational researcher whose appetite for the heavens has been whetted by increasing aperture over the years. More recently, Matt has immersed himself in video astronomy – a means of probing deeper into the night sky while making astronomy accessible to all ages and abilities. With this technology readily available, Matt is considering a career as a sleep-deprivation research subject.
 And to make it easier for you to get the most extensive news, articles and reviews that are only available in the magazine pages of Astronomy Technology Today, we are offering a 1 year subscription for only $6! Or, for an even better deal, we are offering 2 years for only $9. Click here to get these deals which only will be available for a very limited time. You can also check out a free sample issue here.

