
When I heard about the MallinCam HD-10 CMOS video camera and its ability to be controlled both via PC and independent of a PC, I was quite intrigued. I was looking for a CMOS video camera that would deliver high quality imagery and permit a streamlined workflow both with and without PC.
And so it was: The MallinCam HD-10 found a home in my camera case. Used in temperatures ranging from -5F to +90F, under bone-dry and heavy dew/frost conditions, it hasn’t faltered. Having enjoyed its use for personal viewing and sharing the solar system with others over the past year and a half, I found myself motivated to pen a review of the HD-10. Thus, here we are.
Camera Details
The MallinCam HD-10 has a 6.48mm diagonal (2.1 megapixel) chip utilizing 2.9 micron pixels. The small chip, coupled with fine pixels, is intended to reveal complex solar, lunar, and planetary details with a relatively large image scale. Though not designed to be a deep sky camera, the HD-10 can also be used successfully to share bright deep sky objects.
The HD-10 has a variety of functions that control your viewing experience. For instance, both the PC- and camera-only/wireless mouse-controlled modalities permit adjustments in gain, exposure, gamma, and a host of other features. Exposures can range from 1 millisecond to 10 seconds and gain can amplify signal up to 300x.
I find the histogram adjustments available via MallinCam-provided ISCapture PC software to be of particular value when pulling out lunar details. Similarly, PC- and non-PC options enable users to specify both sharpness and noise reduction levels. Denoise functionality is particularly valuable in live viewing sessions. The manual provides additional details on available functions.
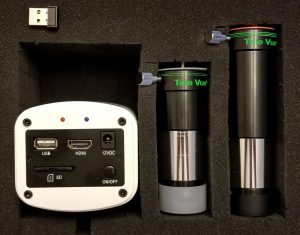
As mentioned earlier, the HD-10 can be controlled via PC (using a USB2 connection) or via the camera’s onboard computer, thereby bypassing the PC altogether. Using an HDMI cable, the camera can be directly affixed to a monitor for wireless mouse-based control of the camera’s onboard software. The various ports can be seen in Image 1.
Control options: PC
To control the camera via PC, MallinCam provides ISCapture software. ISCapture is easily controlled and quite stable. The few instances necessitating reboot came when my USB2 connection in the camera’s port wiggled loose on (too) windy nights.
As with many cameras, users have the option to snap/save a single image (in a variety of formats) or capture the onscreen view via video. When taking .avi video, the user has the option to stop recording manually, or to have it automatically stop after a specified period of time or number of frames. The frame capture rate will vary depending on your denoise/sharpness settings and other software running concurrently.
ISCapture limits individual output .avi files to roughly 2GB. For each increment of 2GB (+/-), the software will close out the current file and begin writing to a new file. This process will repeat itself until the user-specified recording limit is reached. I’ve gathered video that has included as many as 6 individual 2GB files, though you could presumably record as long as you wish within limitations of alignment and storage space. With the video files broken up, I engage VirtualDub 1.10.4 or PIPP x64 (v2.5.9) to successfully append the separate .avi files into a single, large file used for stacking.
Interestingly, if I set ISCapture to automatically save a specific number of frames and have to append .avi files, certain workflows can result in more frames than ISCapture is set to grab…sometimes by a significant margin. For instance, a single run might generate three output files. For easy math, let’s assume each has 400 frames.
Though the final, appended file should have 3×400 (1200) total frames, VDub (loaded on my Windows 10 PC) will create a final file with nearly 1500 frames. On the other hand, if I use PIPP and tell it to optimize for planetary images (as opposed to planetary animation), the effect doesn’t appear. I do not have a satisfactory explanation for this, though the issue doesn’t seem to impact my final images.
Though ISCapture has an automatic white balance function, I find best success manually setting white balance under low saturation levels. To that end, I often use the monochrome setting for lunar viewing to avoid unexpected subtle hues when viewing images across different platforms/social media outlets. For planetary viewing, however, manually finding an optimal color balance is much more forgiving. Given that I like color, I don’t use monochrome for planetary viewing.
Control Options: No PC
Though a wired mouse could be plugged into the camera’s USB2 port, my camera also came with a wireless mouse and dongle. As a result, mouse control need not include an additional cable coming from the camera. It’s fun to view this way (besides enjoying the view) in that the setup is very simple, very streamlined. Just set up the scope and camera, plug in the power cord and HDMI cable, and begin viewing/sharing the sky.
The onboard camera software is very stable: I’ve never had to reboot the camera/monitor. Similarly, the software is straightforward to use. Like the PC option, low saturation is helpful for color balancing with lunar views. Depending on your monitor, sometimes you can enhance live views by adjusting monitor settings. Though the purist may tweak these adjustments from time to time, I adjusted my monitor for viewing a gibbous moon early on, and this one-time adjustment has served me well regardless of target.
The onboard camera software is limited compared to the PC-based ISCapture software in that there are no histogram adjustments. To compensate, I use adjustments in gamma and contrast settings to draw out additional detail. Consistent with PC controls, exposure control doesn’t go below 1 ms. Also like PC control, capture rates will vary depending on sharpness and denoise settings. That said, I most often experience a frame rate of around 25 fpm.
Due to differences in software specifications, the resulting .avi files from a non-PC workflow are substantially smaller than those containing similar frame counts captured using the PC option under default settings. Thus, I have yet to require appending .avi files from the non-PC workflow. As I’ve experienced with other cameras, .avi files will occasionally not process in Registax 6 loaded on my Windows 10 PC.
In such a case, however, if you import the file into a freeware video program like VDub and simply export to a new .avi, successful stacking is nearly always achieved. Again, I’ve had this happen with other cameras with equally low frequency, thus does not appear to be a camera-related issue.
Camera Control: Hybrid Options
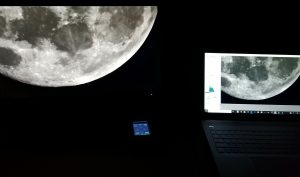
The HD-10 can be used to communicate between the PC and external monitor as a means of avoiding having control windows on the secondary screen (see Image 2).
While an absence of such onscreen clutter might be desired, not every PC setting change will manifest on the secondary monitor when data is passed through the camera’s computer. Most notably, onscreen digital zoom and histogram controls applied at the PC will not be rendered in the external monitor’s view with such a setup. Were someone to ask what my biggest wish would be for the HD-10, I’d have to say the ability to use histogram controls when working without the PC. Histogram controls simply give a lot more flexibility in revealing lunar detail.
I typically prefer consistent views between the PC and secondary monitor…and I personally don’t mind control windows on the secondary monitor. To that end, there is a simple, effective solution: Connect your PC to the external monitor via a PC-to-monitor HDMI cable, and camera to your PC via USB2 cable. In doing so, all PC functionality will be rendered on the secondary monitor (e.g., digital zoom, histogram control, etc.).
Observing: Details
With the small chip in the HD-10, image scale is large and the field of view is small. When desiring wider-fields of view, I use a simple 0.5x 1.25” MallinCam focal reducer with my 100mm SkyWatcher ED Pro refractor. The scope’s native f/9 and reduced f/5 focal ratios provide me with approximately 22’ x 12’ and 40’ x 21’ fields of view, respectively. At its native f/4, my MallinCam 8” Newtonian provides a field of approximately 24’ x 14’. Thus, my telescopes do not cover the entirety of a full moon in a single field.
When looking for ever finer lunar and planetary detail, I regularly Barlow the HD-10 at 2x (f/18) and 3x (f/27). When feeling lucky, I’ve used double Barlows for 6x (f/54) using my 100mm ED refractor (take that, Dirty Harry). As you can imagine, greatest successes were obtained at f/27 and faster f-ratios…f/54 is typically too aggressive for my sessions. As f-ratios slow to evermore extreme levels, bright objects masterfully reveal dust on the sensor window. Typically, my sensor window can be successfully cleaned using an air bulb alone or in combination with my Lenspen SensorKlear II product.
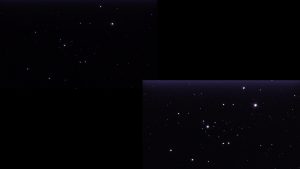
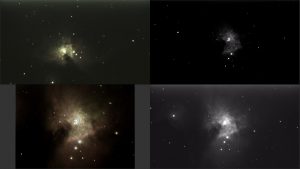
With relatively longer exposures (e.g., approaching the camera limit of 10 seconds) using moderate gain, you start to see a very small number of warm (but not “hot”) pixels and some amp glow appear onscreen. Like many cameras, additional warm pixels and amp glow can be observed as you increase exposure and gain settings. To illustrate amp glow and warm pixels, the collage of NGC 2244 in Image 3 used two 5-second exposures from my 8” Newt at f/4. The upper left image used 13% gain and lower right used 60% gain, both with PC control.
Observing: Objects
The HD-10 is advertised as a tool for viewing solar, lunar, planetary, and bright deep sky objects. Here, I will discuss its use in each setting.
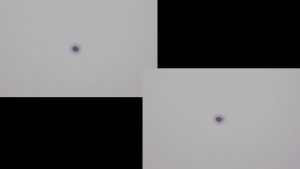
Solar: For full transparency, I do not do a lot of solar viewing. Hence, my solar gear is limited to a white-light filter for my refractor. Image 4 represents sunspot region 2738 at f/9 using my 100mm ED refractor and PC control with a Baader solar filter. The image at upper left was a single frame capture as seen live onscreen. At lower right, you’ll see a Registax-processed stack of best 40% of 306 frames. While the penumbra for this sunspot didn’t reveal many details in poor seeing, viewing the bridge bisecting the umbra in real-time certainly put a smile on my face.
Lunar: I can unequivocally say that live viewing and imaging of the moon with the HD-10 has been incredible, both with- and without-PC. From a visual standpoint, I found that my interests were best served by using low saturation and monochrome images.
For the non-PC images of crater Tycho in Image 5 (moving clockwise from top left), I include a single high-saturation frame (with no white balancing nor post-processing), a single balanced, low-saturation frame (with Registax wavelet adjustment), and a Registax wavelet-adjusted, balanced, low-saturation stack of the best 112 frames of 506 with the video saved to the camera’s onboard SD card. Each was captured on a night of poor seeing in my 8” newt at f/4 within minutes of one another.
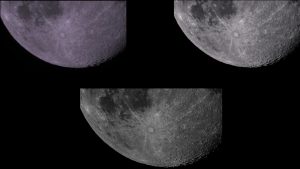
While the white balance of the top-left collage member clearly needed work, I wanted to demonstrate how the image appears with default, non-white balanced settings under high saturation. I juxtapose the first member against the other two to demonstrate low-saturation white-balance success with quality live views and image processing resulting from the absence of a PC into the field.
While color corrected live views can be very similar to the upper right image (wavelets didn’t substantially improve individual frame detail that evening), I have to admit a bias. Where possible, I use my laptop to control the camera. The primary reason is being able to leverage histogram controls for additional detail.
I have found myself enjoying video frame stacking and post-processing as well. In particular, I find it exciting to see what surprises await from stacking and processing video into single, imagination-inspiring images. While this exercise can take some time depending on your software, computer horsepower, and proficiency with the process, the results are well worth the effort (see Image 6).
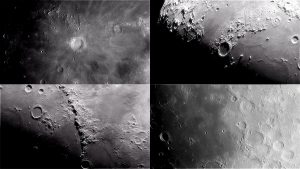
In Image 6, all four PC-based captures used my 100mm SkyWatcher ED Pro refractor. Moving clockwise from top left, we have images from stacked video for Copernicus (f/18), Plato (f/18), Rupes Recta (the “Straight Wall”; f/18), and Montes Apenninus (f/18). Even better? Though the videos were captured in different viewing sessions, the post-processing was done on a rainy evening when I couldn’t get out and view.
The views in Image 6 also lend themselves to a bit of planetary science. Copernicus clearly reveals evidence of secondary impacts in its surrounding ejecta canopy. Similarly, zooming in on the Plato image reveals extensive variability in sidewall shadows on the crater floor, highlighting the rim’s topography.
Though image compression for this published collage removed quite a bit of detail, the Montes Apenninus image still reveals portions of sinuous Rima Hadley and the region in which Apollo 15 astronauts explored. Similarly, being able to clearly discern both transform fault and other nuances of the Rupes Recta region captures the imagination, connecting lunar features to earth-bound geology taught in my children’s primary school.
The bottom line is that, even with a modest refractor and non-premium seeing, the HD-10 enables the user to combine recreation with real science.
HD-10 chip is a great size for close-up lunar and planetary work. However, as mentioned above, my scopes cannot capture the moon’s entirety in a single image. Because I find such images captivating, I often capture overlapping frames and combine them for panoramas with Microsoft Image Composite Editor (ICE).
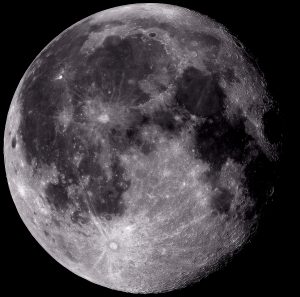
In Image 7, I used ICE to stitch together 15 images, each composed of between 355 and 444 stacked frames from the 100mm ED at f/18, with Registax wavelets added prior to cropping. You wouldn’t see this image live onscreen with my telescopes, but transforming the 15 video streams into this panorama was a great way to spend a blustery, snow-filled winter night.
Planetary: In an ideal world, we would all have unobstructed views of the planets under transparent, stable seeing conditions. In my case, this past year’s planetary parade barely made it more than 40 degrees above my local horizon. By coupling low altitude with zenithal seeing rarely exceeding 3/5 (per cleardarksky.com) during viewing sessions, you have a recipe for soft planetary images.
These conditions make a tool like the HD-10 really shine. The user can capture a video file with several thousand frames in relatively short order. From these, stacking software can select a percentage for frame stacking in those lucky moments of good seeing. Even with a modest scope, the net result can be quite exciting.
In Image 8, I present a collage of cropped Autostakkert 3-stacked Jupiter, Saturn, and Mars frames, all taken with my 100mm ED refractor. Jupiter represents a cropped image at f/18, composed of the best 90% of 1441 frames (May, 2018). Saturn represents a cropped image at f/27 using the best 90% of 7000 frames (May, 2018). Mars represents a cropped image at f/27 based upon the best 30% of 6853 frames (August, 2018).
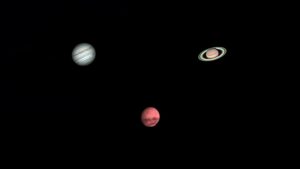
The planetary parade enabled me to watch variants of Jovian shadow, moon, and storm transits; subtle shifts in Saturnian details; and Martian views changing as phases and this summer’s dust storm progressed.
Though these images are far sharper than I typically saw onscreen (the images reflect stacks of best frames, after all), live views revealed details such as the Cassini Division in Saturn’s rings and cloud patterns/shadow transits on Jupiter. Live views also revealed coarse albedo differentiation on Mars, but clear nights of reasonably good seeing unfortunately coincided with the height of this summer’s Martian dust storm. When sharing these live views with others, Jupiter and Saturn were real show-stoppers.
Deep sky: MallinCam literature indicates that the HD-10 can also be used for viewing bright DSOs. This literature is accurate. However, unlike my MallinCam SkyRaider cameras, the HD-10 is not optimal for viewing faint DSOs. If we keep gain low and exposure short to avoid marked amp glow (yes…I am particularly sensitive to amp glow), we are limited to viewing bright DSOs such as open star clusters, bright globulars (e.g., Messier 13), and bright nebulae (e.g, Messier 42).
tried using the HD-10 to capture Messier 31 using my 100mm refractor at f/5, and though the galaxy’s core was clearly visible, detail was elusive. Like most cameras, moving from the small refractor to larger and/or faster scopes (e.g., my 8” newt at f/4) will improve your ability to view progressively fainter DSOs with the HD-10.
In Image 9, I present Messier 42 from a variety of perspectives progressing in clockwise fashion. The image at top left represents a 10 second, low gain, high saturation single frame of M42 captured with my 100mm ED at f/5. For top and lower right, I captured and stacked varied exposure-length frames, using exposures ranging from 1 to 6 and 1 to 8 seconds, respectively. These were captured using my 8” MallinCam Newt at f/4 with low saturation and gain. My goal with the modified HDR approach was to capture detail in the trapezium while still revealing nebulousity.
So, what about the image at lower left? To see what could be done with the different images in concert (yet again, I was killing time on a night of foul weather), I loaded the first three images as separate layers into GIMP 2.10.8 software. There, I manually resized, rotated, processed, and stacked the layers, ultimately cropping the outcome and tweaking wavelets in Registax to create the final image. This image is not representative of what a user will see on screen. However, the workflow begins to hint at what’s possible when processing HD-10 imagery.
Conclusion
Having high-detail imagery readily available from a perch under the stars or viewing remotely with the kids on a cold winter’s night, the MallinCam HD-10 is quite versatile and convenient. As with other astronomical video cameras, my family, my friends…a WIDE range of potential viewers…can gaze at the heavens regardless of limitation and/or tolerance for foul Iowa conditions.
 By Matt Harmston
Matt Harmston is an educational researcher whose appetite for the heavens has been whetted by increasing aperture over the years. More recently, Matt has immersed himself in video astronomy – a means of probing deeper into the night sky while making astronomy accessible to all ages and abilities. With this technology readily available, Matt is considering a career as a sleep-deprivation research subject.
 And to make it easier for you to get the most extensive telescope and amateur astronomy related news, articles and reviews that are only available in the magazine pages of Astronomy Technology Today, we are offering a 1 year subscription for only $6! Or, for an even better deal, we are offering 2 years for only $9. Click here to get these deals which only will be available for a very limited time. You can also check out a free sample issue here.