“When considering the QHY Polemaster I read comments about folks wishing they had purchased the PM long before they did due to its simplicity and effectiveness. I can share that sentiment.”
In the absence of an observatory, typical viewing sessions require that I set up/tear down my scope du jour nearly every time. Though I have taken measures to ensure fairly consistent rough polar alignment, longer focal lengths and exposures necessitate some fine-tuning.
 My Celestron AVX and Losmandy G11G both have polar alignment routines that work well. And, both come with a polar scope if one were to purchase it. But both mounts require time for star alignment before getting accurate outcomes from the polar routines. And my Celestron CG-4 is not a GoTo mount, thus has no PA routine.
Polar scopes are available and reasonably accurate for all three of my mounts, but craning my neck in the midst of sweat-frenzied mosquito swarms or shards of skin-shredding, frozen gravel piercing my coveralls really leaves something to be desired. Enter the Polemaster – a CMOS camera mounted to an equatorial or wedge-mounted Alt/Az mount enabling you to dial in polar alignment independent of the mount’s control software. This article will describe my experiences with the Polemaster.
The Polemaster: What Is It?
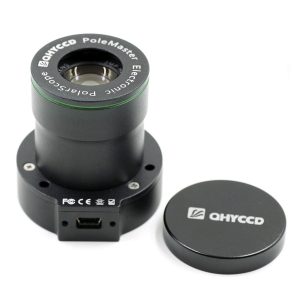
The Polemaster (PM) CMOS camera attaches to the right ascension axis of your mount and communicates with your computer via a vendor-supplied mini-USB2.0 cable (see Image 1).
The PM, upon purchase, requires acquisition of an easily installed, mount-specific adapter plate. When the downloadable, free control software is activated, the alignment routines begin. Oversimplified, roughly align your mount, set exposure/gain parameters in the PM software, select Polaris and target stars, let the software guide you through some simple modeling steps, and ultimately adjust your altitude and azimuth axes for fine polar alignment (in northern or southern hemispheres).
I can attest that my mounts typically take the advertised two to three minutes to complete a very accurate polar alignment, even before the sky gets dark.
User Manuals: Direction or Distraction?
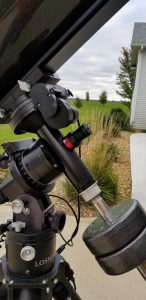
The PM user manual contains directions ranging from physical installment to final fine-alignment. Being pretty handy, physical installation of the unit was straightforward even without the manual’s guidance. However, in later reviewing the manual, I found that it didn’t cover the range of general adapter plate styles applicable to multiple mounts (e.g., screw-in, set screw attachment, and even styles that attach via brackets bolted onto mount housings, depending on the mount manufacturer). Attachment of adapter plates to my mounts is shown in Image 2.
A helpful update to the manual might be to include an annotated example of each general class of adapter plate for user reference.
The other drawback to the physical installation documentation was that though the manual mentioned a focusing hex wrench, it didn’t elaborate. I did read, however, that the camera was supposed to have been focused at the factory. When I mounted my PM, initial views
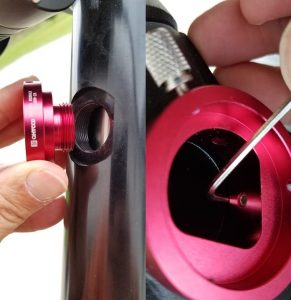
showed dramatically bloated stars … obviously out of focus and barely useable. There was no obvious means of focus and none of the parts appeared threaded nor readily removable (Dad taught me not to force things…). But, the Internet was kind enough to surface a QHY video link revealing threaded detachability of the camera’s outer housing (see Image 3).
Apparently, I had not twisted hard enough when looking for the focus mechanism. Once the housing was removed, the tiny (and I mean TINY) focusing hex wrench released a set screw, enabling me to focus by twisting the knurled knob at the end of the camera’s housing. Get it focused, tighten the set screw, and put the outer covering back on … you are good to go.
Once installment and focusing are completed, you can mount/remove the camera with a simple twist of the knurled, chrome set screw seen at left Image 3. When you do, be sure to attach the PM with its USB port pointed to the east. This way the fine adjustment motions on-screen will consistently match your actions with mount controls.
When I purchased my PM, I bought an adapter plate for both my Losmandy and Celestron mounts. This way, I can swap the camera from one mount to the other as readily as swapping an eyepiece. A fun side note, though it wasn’t advertised as compatible, the AVX adapter plate fits perfectly in my Celestron CG-4 mount as well. Suffice to say, if you don’t see your mount listed on a vendor’s adapter plate list, contact either QHY or your favorite vendor to see what they recommend. There are many plates to choose from, so you may find one that fits, even if it isn’t advertised as such.

Using the Software
The manual clearly describes software download, installation, and camera control, so I will save you the gory details. That said, download and install worked straight off with my Windows 10 machine. Per the website, the PM software will work on Windows 7, 8, and 10. Though I couldn’t find information regarding computer requirements beyond operating system, the PM doesn’t markedly tax system resources. Note, QHY indicates that there are versions under development for MAC/OS and Android cell phones.
I found the PC software to be quite intuitive. After setting desired exposure and gain to capture Polaris and its surrounding star field (under my Bortle 4.0/4.5 skies, I use the minimum exposure and gain setting), a well-documented series of star selections and right ascension mount rotations help the software model your mount’s characteristics and orientation.
With the model established, a series of adjustments can be made to the mount’s altitude and azimuth axes for fine polar alignment. A handy tip is to rotate your mount with its control paddle, computer, etc., as loosening the clutches to rotate manually can create a small amount of play in some mounts. This play can make the loosened model slightly different than when clutches are locked for slewing and tracking.
I couldn’t help but be intrigued by the possibility of Android control, particularly since I don’t want to set up a computer system when doing visual astronomy and don’t want to take time for drift alignment into the evening. So, I downloaded the Android beta version from the QHY website directly to my Galaxy S8 and bought a USB-C to USB-A adapter from Big Box Store, Inc. to interface with the cell phone. There are two apps available in the Google Playstore, and neither appear to have more up-to-date timestamps than that on the QHY website. My bias is to use a vendor’s download over the Playstore, so I can only speak to the QHY version.
The Android software has views, flow, and language that differ a little bit from that on the PC, but the logic is consistent. Thus, by knowing how the PC version worked, I could generalize that experience and use the PM/Android combination to get my RA motor-equipped CG-4 polar aligned for an intimate night of dark sky appreciation.
The aligned CG-4 enabled prolonged observation of Saturn with a 2x barlow and 7mm eyepiece (257x, TFOV of 0.27 degrees) in my f/9 100mm SkyWatcher Pro ED with only minute RA/Dec adjustments needed. Given that the PM costs the same as a mid-to-high end eyepiece ($314US for the camera and Losmandy adapter plate), polished software enabling mobile device control would be an absolute game-changer for those having non GoTo EQ mounts and those not wanting to bring a computer into the field. That said, I haven’t ascertained after emailing QHY when/if Android software updates will be undertaken.
How Well Does the Polemaster Work?
Let me first state that I don’t use guiding with my video astronomy, nor do I log how well my mounts track in terms of PEC, etc. Thus, I cannot quantify the difference between tracking using the PM versus polar alignment routines in my Celestron and Losmandy mounts. Instead, I want to demonstrate how well it works using some unguided images.
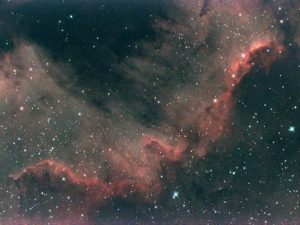
Image 4 represents the “Cygnus Wall” in NGC 7000 taken with a MallinCam DS10c in a MallinCam 10” VRC-CF (reduced to f/5.2) mounted to my Losmandy G11G. I used an Optolong L-eNhance filter, creating a live stack of 13 frames with 90 second exposures and 2×2 binning.
This unprocessed, unguided image was snapped straight off of the computer monitor. As you can see, short of a little coma around the edges, the stars are quite round in spite of the longer exposure time and approximately 1650mm focal length.
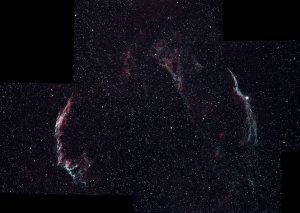
Using my 80mm SkyWatcher Equinox ED (at f/6.2) on my AVX, I snapped 5 images of Veil supernova remnant sections and stitched them together in Microsoft Image Composite Editor to create Image 5.
Each unguided image is composed of 10 live-stacked 60 second frames with 2×2 binning using my MallinCam DS10c camera and an Optolong L-eNhance filter. The final composite was processed in GIMP. Here, too, you can see that the stars are quite symmetrical.
One evening, I took a test image of NGC 6888 with unguided subs of 150 seconds using the 10” RC and Losmandy mount aligned with the PM. But, the images were discarded due to a lack of long-exposure darks (the painful price for a spontaneous decision coupled with laziness). Still, the stars were quite round, even if the image wasn’t very good. Needless to say, I’m looking forward to spending more time with these longer exposures using no binning on ever-fainter targets.
Yes, images 4 and 5 are the result of video astronomy and not astrophotography per se, but dual bandpass filters and long exposures with my video cameras have resulted in exciting nebular views for myself, my family, and my friends.
A Few Cautionary Tales..Sort of…
The biggest limitation to the PM isn’t a flaw on its part, but rather simple geography: You cannot use it if you cannot see the pole star and its surrounding star field. Without the polar view, you’d need to resort to other PA solutions. The second (semi-humorous) caution arises because the PM dust cap has the same outside diameter and coloration as the camera itself. It is easy to set up and forget the cap is on (or so I’m told…cough, cough). If your onscreen view is black, check your cap first.
Finally, pay attention to where you stand when doing alignment. I often stand to the east of my mounts, looking west at my computer monitor while making Alt/Az adjustments. This is fine, so long as I don’t lean toward the computer or reach an arm into the field of view. Doing so will cause the onscreen view to blacken or, if partially blocked, result in onscreen alignment circles and/or boxes dancing around like there’s no tomorrow. If something looks odd, back away from the mount to see if things settle down.
I have read that there could be times when poor seeing will interfere with the PM’s ability to aid in aligning a mount. I’ve experienced some fine alignment challenge from seeing at 1/5 on the Clear Sky Chart, but nothing so bad that my video and visual astronomy alignment needs weren’t met. If you are using the PM to obtain alignments for long-exposure astrophotography, terrible seeing might require a bit of finesse. Of course, terrible seeing might inhibit undertaking AP for other reasons as well.
In Summation
I’ve read comments about folks wishing they had purchased the PM long before they did due to its simplicity and effectiveness. I can share that sentiment. With my Win10 PC, I have had no software instability nor unpredictability, and polar alignments taking well under three minutes have consistently enabled relatively long unguided exposures. Was getting a PM worth the price of a good quality eyepiece? For my viewing style, portable setups, and limited viewing time, the Polemaster was money well spent.
 Matt Harmston is an educational researcher whose appetite for the heavens has been whetted by increasing aperture over the years. More recently, Matt has immersed himself in video astronomy – a means of probing deeper into the night sky while making astronomy accessible to all ages and abilities. With this technology readily available, Matt is considering a career as a sleep-deprivation research
 And to make it easier for you to get the most extensive telescope and amateur astronomy related news, articles and reviews that are only available in the magazine pages of Astronomy Technology Today, we are offering a 1 year subscription for only $6! Or, for an even better deal, we are offering 2 years for only $9. Click here to get these deals which only will be available for a very limited time. You can also check out a free sample issue here.