
We’ve all learned that you should only clean a telescope mirror when it is absolutely necessary, for fear of harming those delicate coatings. If you’ve got a reflector and you want a clean a telescope mirror, there’s no lack of recommendations for solutions to use – and the techniques are just as varied.
All the ones I know of (I won’t pretend to know them all since I haven’t owned a reflector in a long time) require “soaping” up the primary mirror, then rinsing and repeating until clean, or at least cleaner than it was. I’ve seen many people use dish soap and a sponge to clean the mirror before rinsing it. Yikes!
If you have a refractor or Cassegrain telescope then you have no choice but to make contact with the glass. The most widely accepted methods to clean a telescope mirror involve spraying some kind of special solution on the optics, then gently wiping it clean.
That’s probably okay with dust, but if you have pollen on your glass (and you know you do) that’s a really bad idea. Pollen is hard at all points and angles. How can you possibly drag that across the coatings to clean a telescope mirror without doing harm? But it’s probably just as bad to leave it there to eat away at them.
There’s also the risk of water-based solution getting inside the telescope or eyepiece, and the mould that can lead to. We haven’t even talked about the effect that fingerprints or mascara (not mine – star party attendees) can have on your eyepieces! These require much more pressure to remove than something sitting on the surface.
Fortunately, the folks at Photonic Cleaning Technologies have a product that torpedoes those problems by doing away with all the wiping, rubbing and other contact that can cause damage. First Contact is a polymer-based liquid you pour onto your optics – any optics. You let it set, then peel it off, taking all that nasty dirt and grime with it.
That’s it! No spraying soapy water, special cleaner or some other water-based solution on your precious optics, then trying to get it back off without rubbing across the glass any more than you have to. Depending on what you’re cleaning, you use either sticky-backed paper strips (peel tabs) or dental floss, both provided in the kit, to lift an edge of the polymer and peel away.
In the basic kit, you get a half-ounce bottle of polymer with applicator brush and two 1.0-ounce refills, a small sample of dental floss and 30 peel tabs. There are two versions of the basic kit: one with clear polymer and one with a red tint. I got the red one (RFCR). Instructions are included in the kit, which comes in a small, compartmented case which is delivered in a light, safe wrap. It is recommended to store the RFCR kit in that wrap so that the polymer’s red tint doesn’t fade. Light won’t alter the polymer’s effectiveness, just the color which is added to make it easier to see the application.
I have used this product to clean several of my items with tremendous success. I tried it first on my field flattener that I use for astrophotography. When I was done, the glass was cleaner than when it was new. The threads need a little work, but the glass was nice and clean.
Dental floss is recommended with recessed surfaces like this. I did that as instructed and it worked perfectly. The key is to lay the floss on top of the polymer near the edge and let it curl a little bit. You then dribble a few more drops of the polymer on top of the floss and set it with the brush.
Granted, that wasn’t a huge test for First Contact. The flattener doesn’t see much exposure being tucked in the focuser most of the time, but there was some dust on it, and it’s clean as a whistle now. I hadn’t cleaned this earlier, because I was worried about leaving streaks on the glass.
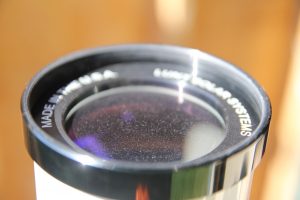
Having that one under my belt, I decided to try it out on my solar scope, a 60-mm Ha refractor. As you can see in Image 5, there was a lot of dust and pollen on the objective. There was also a tiny hint of a fingerprint from one of my solar outreach events. The white and purple you see are reflections of the roof of my observatory – those didn’t come off.
I left the scope on my mount and set it so the objective was pointing up. It seemed like the best way to keep it steady and solid. This is a much bigger surface than the field flattener, and I was wondering just how much of the polymer I would need for this. It felt like I was using a lot, but when the job was done I still had about half of the small bottle left.
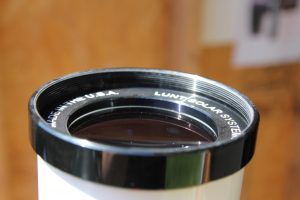
For this job, I just poured the First Contact in small doses and spread it across the objective until I had a nice thick coating on the entire surface. I let it sit for about an hour (probably longer than necessary), then used a piece of one of the pull tabs provided. I simply peeled the tab off the contact paper and pressed it onto the polymer, nice and firmly, right at the edge of the glass. I carefully lifted the tab, and the edge of the polymer came right with it. I then gently pulled on the polymer and was left with nice, clean glass with no sign of any dust or pollen, as shown in Image 3 (Image 2 shows a before view of the dirty surface).
I was really rockin’ now, so I decided to give it a tougher challenge. I dug out one of my oldest and grimiest eyepieces – my trusty, dusty 20-mm Plossl that I use at all of the solar events I host at local middle schools. There have been many fingerprints left behind. I’ve also used it for almost every star party I have ever attended and have even found eyelashes on it. It’s a nasty mess!
I took the eyecup off, poured a little First Contact on the glass and used the supplied brush to spread it around. I know what you’re thinking: he’s rubbing across the glass with that brush. Have no fear. The polymer is very thick, so you aren’t actually making contact with the glass – you’re just spreading the polymer. It’s easy to tell you’re doing it right, because it feels like it’s just sliding across the glass. Think pushing behind the leading edge of the polymer rather than dragging it across the surface, and you’ll get it right.
The before and after shots show that First Contact did a fantastic job, if you ignore the eyepiece exterior.
Okay, enough with the pictures. I think you get the point. I love this stuff and will never clean my optics any other way! But there’s something I wondered about. How long can I leave First Contact on there and still remove it easily? I contacted the company and asked this question, and they actually recommend the polymer for long-term storage. I hadn’t thought of that, but in my opinion it’s actually brilliant. What better way to keep your infrequently used optics nice and clean than to have a barrier between them and the stuff you want to keep out?
One last thing I want to share with you is that First Contact is also available in a pump-spray form to allow easier application to really big mirrors and some of the giant refractors I can only dream of owning. It’s thinner so it can be sprayed, but that just means you need to apply it more heavily. I’m told that it is really best used in this form for large mirrors that you remove from the OTA so you don’t get the polymer all over the inside.
Photonic Cleaning Technologies’ First Contact Polymer’s website product information, order and pricing details, instructions (which are also included in the kit) as well as a short instructional video.
 Dave Snay is a retired software engineer living in Central Massachusetts. He graduated from Worcester Polytechnic Institute and has been an amateur astronomer and astrophotographer for a number of years. He also pursues fine art photography and enjoys traditional black and white images.
And to make it easier for you to get the most extensive telescope and amateur astronomy related news, articles and reviews that are only available in the magazine pages of Astronomy Technology Today, we are offering a 1 year subscription for only $6! Or, for an even better deal, we are offering 2 years for only $9. Click here to get these deals which only will be available for a very limited time. You can also check out a free sample issue here.