By William E. Rison
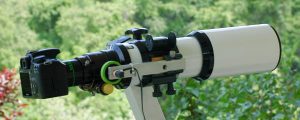 I needed an easily-removable focus motor for my Stellarvue SV80S and came up with the following design that uses a 12-volt DC motor, a wheel for building robots, a 3/4-inch x 3/8-inch x 7-inch section of aluminum bar, and a Vixen/Orion-style dovetail finder shoe. The basic design of the unit is relatively straightforward as the wheel portion of the focus-motor drive simply presses against the fine-focus knob of the scope’s standard dual-speed focuser with pressure between the drive wheel and fine-focus knob being adjusted by moving the aluminum bar in the finder shoe.
The Support Bar
 The top edges on one end of the aluminum bar were ground to a dovetail shape using a bench grinder and file, producing a section that would fit in the dovetail finder shoe and that would slide to and from to adjust the pressure of the drive wheel on the fine-focus knob. A 1/2-inch through hole was drilled at one end of the bar to accept the motor. Two set-screw holes were also drilled and taped to hold the motor in place. If you duplicate this project, make sure the set screws are not over tightened or the motor gear box might be damaged in the process. The other two holes that are shown in the aluminum bar in the accompanying images were not needed and were simply already there from another project.
The Motor and Wheel
 The motor is wired to a 3.5-mm phone plug with the tip providing the positive leg and the shield the negative. Since this is a 12-volt DC motor, the connections only determine the direction the motor turns, so it could be wired any way to the plug. A piece of heat-shrink tubing is placed over the end of the motor where the wires are connected and covers the cable so it cannot be easily broken off. A cable tie holds the wire to the motor and the open end of the heat shrink tubing is cut and glued to form a cap.
The motor is a Sayama Number 12SM-AT3 12-volt DC gear-head motor, that operates at 58 RPM at 12-volt DC and that draws 20 mA (no-load). It is 12 mm in diameter by 35 mm long, has solder-lug terminals, and a 2 mm diameter by 6 mm long flatted shaft. I purchased the motor from All Electronics. The motor runs a little fast for this application, but overall it works fine.
The sleeve around the motor’s gearbox can slip, so I used metal tape to secure it to the motor housing, but any type of sturdy tape can be used for this.
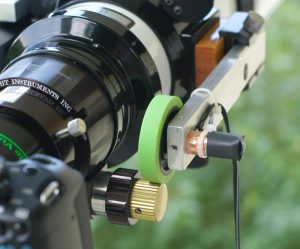
The wheel and hub were purchased from banebots.com and attached to the motor shaft. I used a 1-7/8-inch wheel with 1/2-inch hex mount for the motor. As noted, the motor shaft is 2 mm in diameter and flat on one side, so the wheel hub has some play in it that causes the wheel to run slightly off center. I made sure that the hub’s set screw was positioned against the flat side of the motor shaft to minimize the offset, but there is enough flexure in the wheel to compensate for this. These robot wheels come in varying degrees of hardness and I used the soft (green) wheel so it could be pressed firmly against the fine-focus knob and still provide some flexibility in movement.
The wires from the motor are bent to follow the motor housing and a zip tie was used to secure them. A cap made of large heat-shrink tubing was then placed over the motor end. As also noted, the motor is connected via a 3.5-mm phone plug that can be used with any 9- to 12-volt DC power source that can reverse polarity.
The Bracket Shoe
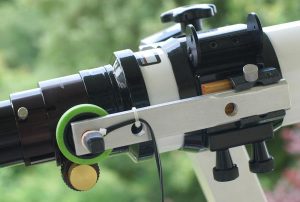
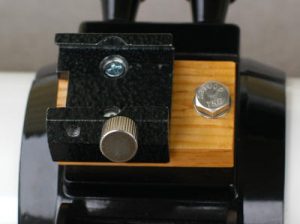 To mount the focus motor bracket to the telescope ring, I had to make a riser block so the focus-motor wheel would line up with the fine-focus knob on the focuser. I used a piece of oak and attached it to the top of the clam-shell ring and then attached the finder shoe to it. This worked out really well, allowing me to also use a finder on the scope when I wanted. Also, I don’t need any extra parts to mount the focus motor. The finder shoe is available from Scopestuff and Orion, to name but two.
The Controllers
The focus-motor assembly has been used with a Meade 1209 Microfocuser control box and with an Astro-Physics GTOCP2 controller on an A-P 900 mount, both without any problems.
A Custom-Built Controller
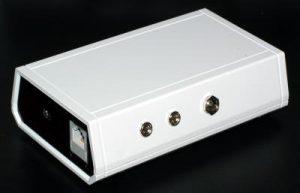 I also use the homebrewed focus motor assembly with my AGF (AutoGuider Focuser Microcontroller) that I custom built using the Parallax Basic Stamp-2 microprocessor and software written in Microsoft Visual Studio. The AGF can control two focus motors plus manual movement of telescope mount via its autoguider port. With this unit I can have a computer control the mount’s autoguiding capabilities and two focus motors and have used this controller to move my mount and focus while imaging planets with a USB video camera, such as the Lumenera SkyNYX2-0. This allows me to move any telescope mount that features an autoguider port, including non-go-to mounts such as the A-P 400QMD. More details about this unit can be found at my Milton Hill Observatory website, http://agf.miltonhill.us.
How Does It Work?
I am now able to control the focuser of my Stellarvue SV80S with a Tele Vue TRF-2008 Reducer/Corrector attached via my AP 900 mount. The motor runs a tad fast, but I am still able to adjust the focus using the Meade 1209 control box or an A-P hand controller. What works best though is my AGF control box connected to a PC. With it I can do “timed focus,” which permits very small movements. I use the AGF and ImagesPlus camera-control software on my laptop to set the focus and it works our really well.
 William Rison has been observing for over 40 years using a variety of telescopes cameras. He maintains the Milton Hill Observatory website which offers a wealth of knowledge on astronomy equipment and observing.
And to make it easier for you to get the most extensive telescope and amateur astronomy related news, articles and reviews that are only available in the magazine pages of Astronomy Technology Today, we are offering a 1 year subscription for only $6! Or, for an even better deal, we are offering 2 years for only $9. Click here to get these deals which only will be available for a very limited time. You can also check out a free sample issue here.