
Celestron CGEM II Mount: The Celestron CGEM, CGEM II and CGEM DX mounts are a midsized class of German Equatorial Mounts (GEM) generically called EQ6 mounts. They are similar to the Orion Atlas mount and the Sky-Watcher EQ6. These mounts are higher capacity mounts than the Celestron Advanced VX but smaller and more portable than the CGE Pro series.
For over a decade, I had been using an Orion Atlas mount for setting up telescopes at star parties. It has been a good working mount. However, in setting it up in the field, it only allows a three-star alignment, which often fails unless the polar alignment is nearly perfect. It has a good polar alignment scope, but even zeroing in with it doesn’t always result in good three-star alignment for using the mount’s go-to feature.
At my college’s observatory, I have been using a pier-mounted CGE Pro and an older Celestron CGE on wheels, rolling it out of the building onto a concrete pad to do visual observing while doing CCD imaging inside with the CGE Pro. With my CGE mount, all I have to do is eyeball the polar axis towards Polaris and run the two-star alignment with four calibration stars. The go-to commands then do a good job of centering any object I request, all with a rough polar alignment.
I find the CGE and CGE Pro mount a little too heavy to travel with and set up at star parties. Also, the CGE cables have been problematic over the years, and it often decides to go the long way around the declination axis when slewing to objects. So, I decided to try the Celestron CGEM II Mount, with its internal cabling, for my travel mount.
After ordering I received the mount in two boxes. The first box contained the mount head, the hand controller, the instruction manual, a DC power cable and a counterweight bar. The second box contained the tripod and counterweight.
The Tripod
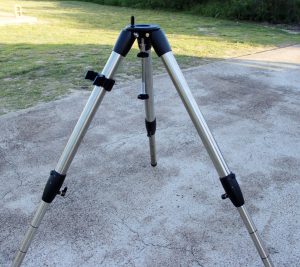
The first thing I unpacked was the tripod (Image 1). The tripod is essentially the same as the one that came with my Atlas mount. It weighs 17 pounds (7.7 kilograms). The legs are 2.0 inches (50.8) in diameter and 32 inches (81.28 centimeters) long. They telescope out another 24 inches (60.96 centimeters) for placing a telescope at standing height.
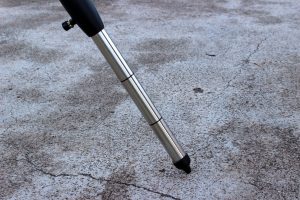
New to the Celestron CGEM II Mount are graduations on the legs (Image 2). The lines are separated by 5.0 inches (12.7 centimeters) and make it easier to extend the legs to equal lengths to level the mount. I am surprised that no company has introduced this feature before. It’s easy to interpolate between the 5-inch ticks to get the legs equally extended.
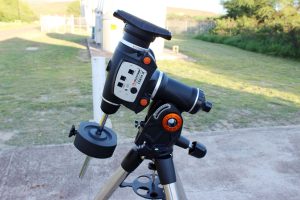
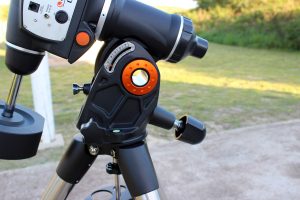
A single bolt through the top plate on the tripod holds the mount head firmly in place. The mount weighs around 41 pounds (18.6 kilograms) – similar to the Atlas – and is not too difficult for one person to set on top of the tripod and lock down with the hand knob between the tripod legs. Image 3 shows the mount head attached to the tripod. Note the spreader plate, which keeps the tripod legs stable and holds a few eyepieces.
The Mount
The counterweight slides onto the 0.75-inch (19 mm) diameter bar. The supplied counterweight is supposed to be 17 pounds, but when I weighed mine at home, it came out to 19.1 pounds (8.7 kilograms). I got a bonus 2.1 pounds in the deal.
My Atlas mount came with two 11-pound (5 kilogram) counterweights. They are interchangeable with the Celestron CGEM weights, as the holes are all 20 mm in diameter. Both mounts are rated for a 40-pound (18.1 kilogram) payload. The mount can accept both Losmandy-type and Vixen-type dovetail plates. There are two knobs with generous sized handles to secure either style dovetail plates to the mount.
This might be good time to note the difference between the CGEM II and the CGEM DX mounts. The CGEM DX has a 45-pound (20.4 kilogram) tripod with 2.75-inch (7-centimeter) diameter legs and a counterweight shaft 1.25 inches in diameter. Because of these features, it is rated to carry 50 pounds (22.7 kilograms), 10 more than the CGEM II. But the mounts are essentially the same internally. The CGEM II tripod is still very sturdy for its payload rating, and I prefer to transport and set up this lighter tripod when travelling!
Plugging In
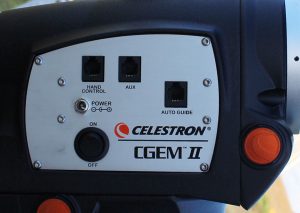
The close-up picture of the Celestron CGEM II Mount in Image 4 shows where most things plug into it. The 12 V-volt power cable jack is on the left above the on/off switch. Other jacks include the hand controller port, an autoguider port and an auxiliary port. I plugged my Celestron GPS unit into the AUX port during the inaugural test run, so I didn’t have to enter the date, time and coordinates into the hand controller.
Polar Alignment – Method One
With the leg under the counterweight in Image 3 pointed north, I was ready to polar align the mount. Image 5 shows the two knobs used to adjust the mounts azimuth. One azimuth knob is centered in the image, and the other is barely visible in the upper left corner of the image. All knobs have large easy-to-grip handles, something Celestron mounts have that other versions of EQ6-class mounts don’t.
There is a built-in bubble level on the side of the mount. The mount must be leveled before polar alignment can occur. I found the bubble a little hard to see without a white flashlight, even in the daytime.
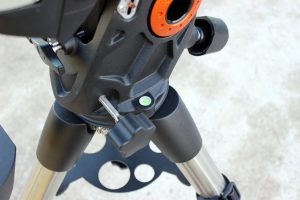
Image 6 shows the latitude scale for the mount. The scale varies from 15° to 70°, the useful latitude range for the mount. The big knob on the right raises the altitude of the mount when cranked in and lowers it when cranked out. The smaller knob on the left is supposed to oppose the right knob and lower the altitude when cranked it. I found it did neither. I turned it all the way in as far as it would go, and it would not lower the altitude as I backed out the right knob. Therefore, I had to push down on the counterweight side of the mount to lower it after backing out the large knob. My latitude is 22° N, so I set the latitude for just under this so I could raise the mount during the polar alignment process using the big knob on the right.
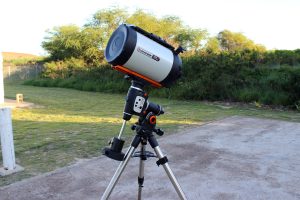
The Celestron CGEM II Mount is advertised to carry up to an 11-inch Schmidt-Cassegrain telescope. So, I attached a Celestron HD1100 to the mount to see if it would hold it (Image 7). The supplied counterweight was not near big enough, so I added an additional 12.5-pound weight I brought with me. It was still not enough to balance this 11-inch SCT, so I was unable to test the mount with this telescope.
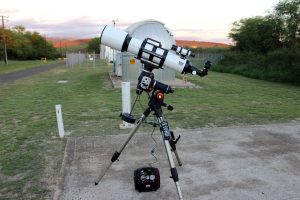
Next, I put my 6-inch refractor on the mount (Image 8). The supplied counterweight set all the way down the bar provided perfect balance. As soon as it was dark, I started the polar alignment.
There are two ways to get a good polar alignment with the CGEM II. One method is to use the All-Star polar-alignment routine in the hand controller. First, perform a rough alignment by setting the latitude scale and pointing the right ascension axis north. Then perform a two-star alignment with the hand controller and add one to four calibration stars (four is the maximum).
At this point, the All-Star polar alignment procedure needs to be followed. First, slew to a known bright star in the database, then center and align it. The star should not be one of the alignment stars. After it is centered, the mount will slew to where the star should be located. Next, using only azimuth and altitude knobs, not the hand controller, the star must be re-centered in the star in the eyepiece. This corrects for the alignment error and the mount should then be accurately polar-aligned. The method works great!
Unfortunately, since the mount has been moved, the two-star alignment and calibration stars must be repeated to get accurate go-to slewing. The instruction manual does a poor job of explaining this alignment procedure. It doesn’t state where in the hand controller menu to find the alignment procedure. However, with a little hunting, I was able to find it and perform the procedure.
Polar Alignment – Method Two
The second way to get an accurate polar alignment is to purchase and install the optional polar-alignment scope. My Orion Atlas EQ6 came with a standard polar-alignment scope that was factory collimated. For the Celestron EQ6 mounts, the polar-alignment scope needs to be owner installed and collimated before it can be used. Fortunately, this collimation only needs to be done once. After the polar-alignment scope is screwed into the mount, its three Allen screws are used to adjust its collimation.
Here is another case where the included instructions are poorly written. I wish they stated the proper size Allen wrench to use with the alignment screws. The instructions directed me to point the polar-alignment scope at Polaris, if collimating it at night, or horizontally at some object a mile away, if aligning it in the daytime. Since the altitude adjustment on the scope only goes down to 15°, pointing it horizontally is difficult unless one leg is lowered to a precariously posture that could cause the mount to tip over. I chose a different method.
I drew a crosshair on a plain sheet of paper and taped it to a wall inside my house about 40 feet (12.2 meters) away from where I set up the mount. Then I used the azimuth and altitude knobs to center the paper’s crosshairs in the polar alignment scope. The idea is to adjust the polar-alignment scope setscrews so that, when the mount is rotated 180° in right ascension, the crosshairs on the polar alignment scope stay centered on the object being viewed, in my case the paper’s crosshairs. The process is tedious, but I was successful after about 30 minutes of tinkering.
Out in the field, I again aligned the mount using the polar-alignment scope. Unlike the Atlas mount, Celestron mounts do not illuminate their polar alignment scope. Several times during the alignment procedure, I had to shine a red light into the objective end of the polar alignment scope to see the etchings.
To test the polar alignment, I then ran the Celestron CGEM II Mount through the All Star alignment routine to see if there was any error. There was none, attesting to the accuracy of my polar-alignment scope’s collimation and the polar alignment obtained with the instrument. While it is not necessary to purchase the polar alignment scope, and it won’t work without a clear view to Polaris, I found using the polar-alignment scope to be much faster than the All Star alignment method. The two-star alignment routine, with calibration stars, is run only once after aligning the mount with the polar alignment scope.
Performance
How did the mount perform? After the mount is polar aligned and a mount model is conducted with two alignment stars and three or four calibration stars, the mount’s go-to capabilities placed any object I called for into the center of the eyepiece. I am quite happy with the performance of the mount.
Another feature of the mount is the mini-USB port in the hand controller for controlling the mount with a computer. A mini-USB-to-USB cable is not included, but I happen to have several. I tested the mount with two telescope control programs: Voyager by Carina Software and The Sky X Pro from Software Bisque. Both drove the mount to called objects as accurately as the 40,000-object database in the hand controller. Both software programs have millions of objects in their databases, so using a computer to control the mount has advantages.
I have yet to measure the mount’s periodic error and test its imaging capabilities. However, I have used other EQ6 mounts for astro-imaging and find them to be perfectly suitable for telescopes with focal lengths under 800 mm.
In conclusion, I am very happy with the Celestron CGEM II mount and hope to have many years of use with it as my travel mount. The set up is quick, it handles the weights of each of my travel telescopes, and it finds objects with the hand controller or laptop control and accurately centers them in the eyepiece.
 James Dire has an M.S. degree in physics from the University of Central Florida and M.A.and Ph.D. degrees from The Johns Hopkins University, both in planetary science. He has been a professor of physics astronomy at several colleges and universities. Currently he is the Vice Chancellor for Academic Affairs at Kauai Community College in Hawaii. He has played a key role in several observatory projects including the Powell Observatory in Louisburg, KS, which houses a 30-inch (0.75-m) Newtonian; the Naval Academy observatory with an 8-inch (0.20-m) Alvin Clark refractor; and he built the Coast Guard Academy Astronomical Observatory in Stonington, CT, which houses a 20-inch (0.51-m) Ritchey Chrétien Cassegrain.
And to make it easier for you to get the most extensive telescope and amateur astronomy related news, articles and reviews that are only available in the magazine pages of Astronomy Technology Today, we are offering a 1 year subscription for only $6! Or, for an even better deal, we are offering 2 years for only $9. Click here to get these deals which only will be available for a very limited time. You can also check out a free sample issue here.