
By Gary Parkerson, Executive Editor Astronomy Technology Today
I’ve used many white-light solar filters over the years, including examples made with glass ranging from poor to excellent in optical quality. Of course, those with coatings deposited on inexpensive plate glass were, well … inexpensive, but they also delivered poor views. At the other end of the glass-substrate spectrum, those fashioned using high-quality optical- grade glass produced excellent views but at prices that reflected their excellence. If 1/20-wave precision is your goal, when it comes to glass, expect to pay dearly for it.
A Brief Explanation of Solar Filters
For those of you who are new to all this, solar filters are of two basic types: broadband and narrowband. Broadband solar filters are called broadband or more specifically, white-light filters, because they pass the broadest spectrum of light emitted by the Sun, which appears white.
We see the Sun as yellow only because our atmosphere scatters much more of the blue wavelengths. Add back that blue, and you have the definition of white. Although white-light filters pass the fullest breadth of the spectrum of solar light, they reduce the intensity of that full spectrum significantly.
Baader Planetarium’s AstroSolar material, which is the subject of this article, has a light reduction factor on the order of 100,000 times, and it is that intensity reduction factor that allows us to safely view the Sun through a telescope.
The simplest white-light filters mount in front of the telescope, where they can reduce that intensity before the sunlight enters. That is the type of whitelight filter covered by this article. There are exceptions, though, such as Herschel Prisms, also known as Hershel Wedges, that are placed between the telescope and the eyepiece through which you view or the camera with which you image. Baader Planetarium also produces a Herschel Prism, which, for point of reference, Astro-Physics lists for $710US.
Narrowband solar filters do not deliver the full spectrum of solar light. Instead, they are designed to deliver only a very narrow slice of that bandwidth, such as the Hydrogen-alpha wavelength centered at 656 nanometers. By passing only the Hα wavelength and rejecting the rest, we’re able to observe and photograph detail that is hidden in the relative intensity of rest of the solar spectrum, such as solar prominences.
A New Demand for Solar Filters
With the Great American Eclipse looming upon us, I’m regularly sharing views of the Sun in both
white-light and Hydrogen-alpha, it’s a rare day that I’m not asked about affordable solar-viewing and -imaging options. The solar equipment I currently carry include a Sky-Watcher USA 90-mm Maksutov- Cassegrain fitted with a factory-made solar-film filter, Lunt Solar System’s 8×32 (white-light) SUNoculars and an Explore Scientific ES80CF mated with a DayStar Quark (Hα).
When I explain to guests that both the Sky-Watcher Mak and Explore Scientific apo can be used for nightsky and daylight terrestrial viewing and imaging, as well as for solar, many are reminded that they already own binoculars or spotting scopes. A surprising number even recall astronomical telescopes hidden away in closets and garages. It doesn’t take long for them to wonder whether they, too, can convert their sporting optics or telescopes into solar scopes.
And as I explain the options, the next inevitable question is, “What does that cost?” Reactions to each answer remind inexpensive to those of us who enjoy astronomy daily may not feel as affordable to those whose current interest in astronomy is still limited to a one-time viewing of the August 21, 2017 eclipse.
Having experienced it, some of the thousands who see the Sun for the first time through the equipment I carry will invest in Hydrogen-alpha telescopes capable of approaching the thrilling detail produced by the DayStar Quark, despite that the entry point of Hα is around $600US and climbs quickly from there. Others will opt for glass-based white-light filters, which can be found in so-so entry-level quality for as little as $70US, but the price of which climbs drastically when the glass substrates approach 1/20-wave precision.
I’d like to recommend glass filters because of their durability, and given what they deliver, high-quality glass-substrate white-light filters represent a remarkable value, but even that $70 threshold of entry-level quality feels too expensive to many I meet.
AstroSolar Yesterday
Fortunately, another great solar eclipse created the economies of scale necessary to justify research and development behind one of the true marvels of affordable solar viewing and imaging, Baader Planetarium’s AstroSolar filter material.
On August 11, 1999, a total eclipse of the Sun traversed densely populated regions of Europe and Asia. In fact, the path of totality was so populated, that Baader Planetarium delivered solar-safety film for 19 million eclipse viewers.
The costly development of Baader’s AstroSolar film was only possible due to this unprecedented demand. Miles of film alternatives were tested to destruction before yielding a substrate of sufficiently- uniform molecular structure, not to mention the related testing of
annealing and dual-surface coating treatments the ultimate film underwent.
It’s thanks to that 1999 eclipse that I’m able in 2017 to answer the cost question with, “There’s an insanely-affordable DIY alternative you should consider.”
AstroSolar Today
At some point since the early 2000s, I quit considering Baader AstroSolar an inexpensive alternative to high-quality glass filters and came to think of it instead as the preferable alternative … regardless of cost.
Yes, AstroSolar is, in my experience, a bit less durable than glass filters, but it’s still remarkably tough and is of delivers are as good as any I’ve experienced in white light, save for through Herschel wedges.
Now that so many of us are working to help millions get the most out of the August eclipse, I’m especially thankful that it provides such an affordable path to solar-viewing excellence.
against 100-grit sandpaper flat on a tabletop.
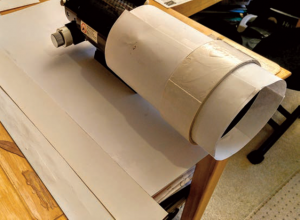
At our request, Astro-Physics (A-P) supplied several samples of Baader AstroSolar A4-size ND 5.0 kits, each of which contains a sheet of filter material measuring 200 by 290 mm (7.9 by 11.4 inches) and is priced at $43US. A single kit included enough material to make filters for the ES80CF refractor, a Celestron Hummingbird 9-27×56 ED spotting scope (and what a wonderful little scope it is!) and 4×30 travel binoculars (love those, too!).
A-P also supplied a 1/2-meter ND 5.0 kit, which for $88US includes a huge rectangle of Baader AstroSolar material measuring 500 mm by 1000 mm (19.7 by 39.4 inches).
As with white-light filters formed with glass, I’ve used many filters equipped with Baader AstroSolar material, some of which were factory produced (mostly by Kendrick Astro Instruments) and some of which I crafted myself. I made the later by gluing AstroSolar onto rigid rings cut from thick PVC pipe with inner diameters just larger than that of the outsides of the dew shields or scope tubes.
Before attaching the AstroSolar material, I drilled and tapped the rings to accept three evenly spaced nylon screws tipped with rubber for
fastening the rings to the scopes. This PVC-ring strategy worked well, so long as I took care to avoided stressing the material in the process.
Optically, AstroSolar is almost magically benign, but loses that quality if stretched. Still, PVC pipe of the necessary thickness and diameter is often available only in 10-foot sections, so is relatively expensive and cumbersome to work.
Fortunately, the detailed instructions included with each of A-P’s kits describe an easier, more affordable method of mounting AstroSolar on a telescope. My goal for this article was to follow those instructions as closely as I could.
I should note that I did not tackle this project alone. My eyes and hands aren’t what they used to be, so my friend Sheryon handled the finer work. She’s a crafty lass, but this was her first attempt at DIY-astronomical anything, so she provided a great test of the newbie friendliness of A-P’s Baader AstroSolar kit.
At the end of the day, we’d had a delightful time working together on the project. The first filter cell we constructed was for the ES80CF.
Here’s what we did, instruction by instruction.
Tools and Materials Used
One Astro-Physics A4 Baader AstroSolar Kit, compass, utility knife, scissors, 100-grit sandpaper, Elmer’s white glue, generic disappearing Scotch-type tape, Scotch-brand double-sided poster tape, two sheets of 14-inch by 22-inch white poster board, a small hand-held stapler and eight standard paper staples.
Instruction One:
“Cut two equalized rings out of stiff cardboard. The inner diameter should match the full aperture of the objective lens, the outer diameter should be 10 cm (~4 inches) larger.”
We’re in a large metropolitan area as I write this – Las Vegas – but the only stiff cardboard Sheryon and I could find was corrugated and
thus not suitable for this project. Fortunately, A-P shipped the A4- sized kit in a rigid envelope made from stiff, single-ply cardboard measuring approximately 12.25 by 9.75 inches (31.11 by 24.76 cm). Perfect! Better yet, they included an 11.75 by 9.25-inch sheet of the same stiff, noncorrugated cardboard inside. Cardboard-sourcing problem solved! For now.
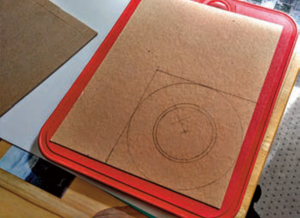
We used a $2 compass to draw the circles that defined the two rings. Per the instruction, we first drew an inner circle measuring 80 mm in diameter, the aperture of the refractor. But concern over finishing the project with that inner circle perfectly concentric with the scope’s objective caused us to draw a second inner circle at 90 mm, leaving us 5 mm of radius- alignment leeway.
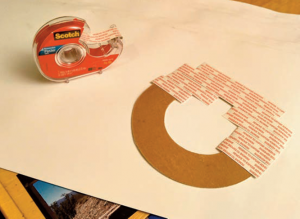
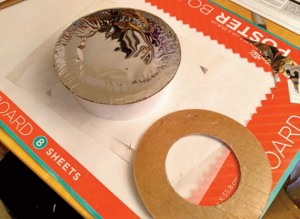
In hindsight, we’d have experienced less stress with an inner circle of 100 mm, but in the end, 90 mm proved just enough to compensate for slight misalignment of the assembled components. mm diameter, then drew a square measuring 152 mm per side and centered on the concentric circles (Image 1).
A-P’s instructions called for an outer circle of roughly 180 mm, but I wanted to carry this filter the rest of my bike journey and needed the
filter cell to be as small as possible. So, we compromised at 6 inches.
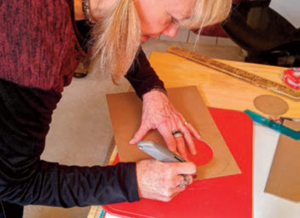
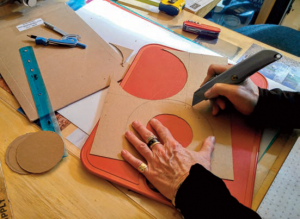
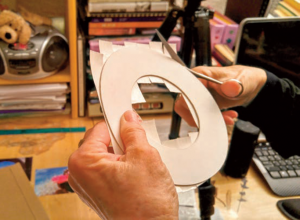
My plan was for Sheryon to first cut out the 6-inch square, reasoning that it would be easier to handle than the full cardboard rectangle, but she found it easier to work first on the 90-mm inner ring using a utility knife (Image 2), and then used the knife on the outer ring. When the first ring was removed, she used it as a pattern to draw the second ring, and repeated the process (Image 3).
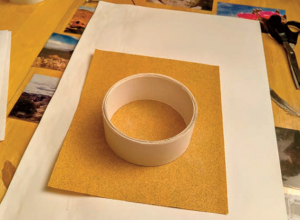
Then we deviated from the instructions a second time. We had white poster board on hand (more on that later), so repeated the process a third time to create a white ring, to be glued to one of the stiff cardboard rings (Image 4). The white poster-board ring would serve as the Sun-facing side of the finished AstroSolar cell. Not only would it be a bit more reflective, but I thought it might look better, too.
Sharon sanded the ring edges to dress them a bit, and then we glued the white ring to one of the cardboard rings using Elmer’s Glue-All white glue.

Instruction Two:
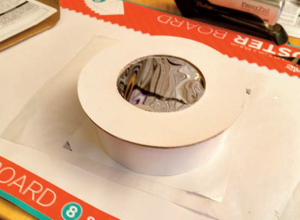
“Cover one full face of each cardboard-ring with double sticky film or “Double-Tape.” Cleanly cut away any inner and outer excess tape, so that only the two cardboard faces of both rings are covered with the sticky tape.”
For “double-sticky film,” we used Scotch-brand 0.75-inch-wide poster tape (Image 9), because that’s what was on hand. 3M markets some double-sided bonding tapes that are amazingly tenacious – far more so than the Scotch poster tape – and while I agree that safety argues in favor of the stickiest option, we preferred the more forgiving Scotch option, as it allowed for re-dos. But in an abundance of caution, we deviated from the instructions to add additional fasteners, as I’ll describe later.
Sheryon trimmed the excess doublesided tape using scissors (Image 10), then repeated the process with the backside of what would be the front ring. As I’ll explain later, we completed Instruction Nine before beginning this step.
Instruction Three:
“Stretch out a square piece of “Kleenex” or similar facial tissue flat on a hard plane surface (a table) and secure the four corners of the tissue with clear adhesive tape. The tissue must be without any wrinkles.”
A-P to the rescue, again. The A4 kits they provided each included a protective sheet of tissue paper of the same dimensions as the AstroSolar material. We deviated from this instruction by waiting to execute it until completion of Instruction Eight, as I’ll explain.
Instruction Four:
“Cut a square piece of AstroSolar Safety-Film a little larger than the outer diameter of the stiff cardboard rings. (For cutting, put AstroSolar Safety-Film between two sheets of white paper. This ‘sandwich,’ with both sides paper and the film in between, can easily be cut without producing creases or fingerprints on the film.)”
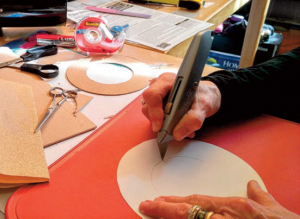
We followed this instruction precisely, as well, after drawing a square on one of the outer paper surfaces slightly larger than 6.0 inches, which square served as our cutting pattern (Image 11).
Instruction Five:
“Gently place AstroSolar Safety-Film onto the flat Kleenex-tissue and secure the four corners with tape – but do not stretch it! AstroSolar Safety-Film must not be put under tension if it is to retain its precision optical property.”
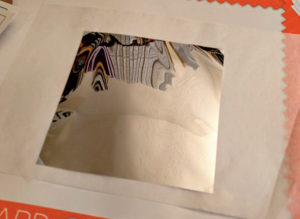
The sheet of AstroSolar material supplied by A-P arrived with one side covered with a white protective film. We placed that side facing down – against the tissue – and secured the four corners to the tissue paper with tape being careful not to stretch the material or introduces any ripples, creases or folds (Image 12).
Instruction Six:
“Hold one cardboard ring, with the sticky side down, 10 mm [about 0.4 inch] above the film, and let it fall down onto the film, so that the ring touches the film all around at the same time.”
to the AstroSolar film.
Despite the do-over-ness of the Scotch poster tape, it was surprisingly hard to let go. The 6.0-inch diameter of the ring was too wide for my dominant, right hand to span comfortably, so I had to use a two-hand approach, knowing that my left hand wasn’t nearly as clever as its mate.
I needn’t have worried, though. I did not have to reposition the first ring. Although my left hand’s release did indeed lag the right’s, the result was fine. Attaching the cylinder before this step help control the accuracy of the drop.
Sheryon trimmed the excess film with scissors (Image 13) before we applied the front ring (Images 14).
Instruction Seven:
“Turn around the cardboard ring with the film-covered side facing upward and lay it back onto the Kleenex. Stick the second cardboard ring against it. Now you have created a round film-holder with AstroSolar Film cleanly and securely fastened without creases and ripples – but, most of all: without stressing the film!”
We deviated from this step to the extent of removing the white film that protected one side of the AstroSolar material before placing the second (front) cardboard ring against the film, doubletapped side down. As the instructions anticipated, the AstroSolar material was secured – stress-free – between the two rings. There were mild waves in the material, but no image-damaging ripples, creases or folds (Image 15).
Instruction Eight:
“Now put a 50- mm (2-inch) wide stripe of strong cardboard around the objective lens or
telescope dew cap and tape the ends with double tape. Repeat this procedure three times with double-tape between each layer to produce a stiff 50-mm long cardboard cylinder to precisely fit your telescope.”
We deviated significantly here, primarily because we did not have enough strong non-corrugated cardboard to do the job. Instead, we used
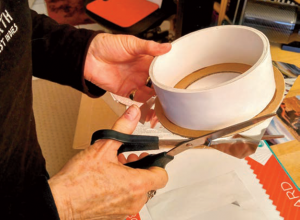
the next-best substitute we could find – 14-inch by 22- inch sheets of white poster board – from which Sheryon cut eight strips each measuring roughly 50 mm (~2 inches) by 56 cm (22 inches).
Before applying the strips to the ES80CF’s dew shield, we taped two sheets of copy paper around it – as tightly as we could – to protect it from what was to come. Next, rather than using doublesided tape to secure the individual wraps, as instructed, we roughed the semi-gloss surfaces of the poster board with fine-grit sandpaper to better accept glue, then after completing the first wrap, applied Elmer’s white glue to the outer surface of each successive strip, until we’d applied enough glue to secure the final wrap (Image 5).
Having two sets of hands made this much easier. We let the glue cure overnight, then slid the cylinder off the dew shield. The eight strips of poster board produced a cylinder with a wall thickness of just less than 0.25 inch (6 mm). It was very rigid, but the edges weren’t exactly flat, so I rubbed them against 100-grit sandpaper until they were (Image 6).
Instruction Nine:
“At last, glue the AstroSolar film holder onto the 50-mm cylinder while the cylinder is still mounted onto the front end of your telescope.”
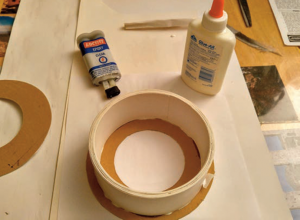
We deviated here, as well, mainly because I was concerned that we might slop glue onto the AstroSolar film if we installed it in the ring holder before gluing the holder to the cylinder. So, we glued the poster-board cylinder to what would serve as the rear cardboard ring before installing the film. We used Elmer’s for this step, as well, spaced between three dabs of two-part epoxy (Image 7). We would have used epoxy for the full circumference, but all we had on hand was a small amount left over from a bike repair.
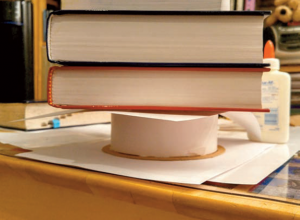
We pressed the joint together with a stack of books and let this, too, cure overnight (Image 8). Whether because of the Elmer’s, the epoxy, or both, the result was a secure bond. Then again, applying the abundance-of-caution rule, we added a finishing bead of Elmer’s to the outer joint.
We then moved back to Instruction Two.
Refinements
The two sheets of thin copy paper I’d used to protect the dew shield from glue were thick enough that the cylinder slid back on easily after I removed them. But it didn’t fit so loosely that there was risk of it inadvertently slipping or blowing off.
I’d planned to shim the cylinder with strips of tape if the fit was too loose, but, in the end, this wasn’t necessary (Image 16).
Finally, I applied staples along the outer rim of the filter disk rather than rely entirely on the double-sided poster tape (Image 17). The assembly would have been prettier without them, but I go with function over form whenever they are in conflict.
The Result?
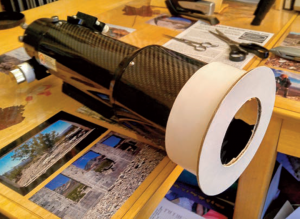
White-light solar-viewing excellence! Baader’s AstroSolar material is amazing stuff, and I had enough left over from the first kit to craft filters for the Celestron spotting scope and the little binos, too. That’s four filters and three white-light solar-ready optical systems for less than$50US.
Baader claims that its AstroSolar material consistently produces Strehl ratios of 94 to 96 percent in interferometric tests and is indistinguishable from glass substrates with a 1/20-wave precision, and I believe these stats. I can detect no degradation of views through these DYI AstroSolar filters.
I also enjoy that the material depicts the Sun in its natural, neutral-white color. Also, because the material delivers the full solar spectrum, it combines well with color and interference filters to better allow observers and imagers to concentrate on narrower spectral passbands that better differentiate target layers within the solar atmosphere.
Maintenance
Astro-Physics includes detailed cleaning and care instructions with its Baader AstroSolar kits, foremost among which is the suggestion that users store their DIY filters in tight enclosures, such as by Tupperware or Rubbermaid food containers.
I agree. I carried the factory Sky-Watcher filter in a heavy-duty zip-lock bag from Los Angeles to Utah and back to Las Vegas, and its front surface shows significant wear. There are no pinholes, but the front coatings were thoroughly scuffed, requiring its replacement.
I did not have the presence of mindto buy a round, tough-plastic food-storagecontainer, but I invested in enough forall my new solar-film filters before pedalingon.
I won’t quote the maintenance instructions in their entirety, but they caution avoiding fingerprints on the film’s metalized surfaces, just as you would with any other optical-grade filter or mirror surface. Similarly, it’s better to blow dust and grit from those same surfaces rather than try to brush them away, but you already knew that, too.
If the material must be cleaned, A-P recommends air-dusting it first, then using a solution of mild dish soap and distilled water. Finish with A-P’s Lint- Free Professional Optical Cleaning Wipes, or sterilized all-cotton wool (available in many pharmacies), using gentle strokes, each with a clean portion of the
wipe. A-P reports that the coatings ofBaader’s AstroSolar material are harderthan the standard aluminum coatings regularlyapplied to mirror surfaces, so if youuse the same care in cleaning the AstroSolarmaterial that you give your favoriteprimary mirrors, all will be well.
My personal rule is, I don’t touch any optic with more than air, unless the accumulated grunge noticeably impacts views. Ditto AstroSolar. Examine the filter surfaces before each use by holding the filter in front of the Sun. A-P suggests that if scratches or pinholes show up, exceeding a combined uncoated area of 4.0 square millimeters, the film is regarded unsafe and must be destroyed.
No single pinhole should exceed 0.5 mm in diameter. Tiny pinholes can be covered with a black felt-tip marker. A-P recommends using the marker on the inside surface of the film to preserve the esthetic appearance of your filter.
A-P also recommends examining the integrity of your DIY filter cell before each viewing session. AstroSolar material is so affordable, my advice is, when in doubt, throw it out and build another.
I prefer to look at it as a painless opportunity to again improve on my previous efforts.
Conclusion
I was already a fan of Baader’s AstroSolar material long before I contemplated this project, and nothing I experienced since has changed my mind. I’m particularly impressed with the kits Astro-Physics has put together.
They thought of everything to make this a fun project. And the fact that a single $43 A4 kit yielded quality filters for an apo, a spotting scope and binoculars is … well, it’s kind of magical, no?
###
 The Astronomy Technology Today editorial staff would like to take this opportunity to remind you of the availability of our Solar eclipse equipment guide – The Definitive Equipment Guide to the 2017 Solar Eclipse. Our goal with the 40 page publication is to provide an easy-to-consume introduction to the technological options for viewing and imaging the Great Solar Eclipse. We cover the gamut of options available including building your own solar viewer, solar glasses, smart phones, DSLR cameras, using astronomy telescopes, solar telescopes, using binoculars, solar filters (including a DYI filter option), CCD astro cameras, astro video cameras, webcams and much more. You can view the guide on our website here – its free and there is no requirement to sign up to read the guide.