
 By John Paladini
John Paladini is a Software Engineer with a Masters Degree in computer science. He lives in Putnam county New York and is a member of the Westchester Amateur Astronomers. He has been involved in the hobby since bitten hard by the astronomy bug when, at the age of 13, he got his first view of Saturn through a 10-inch telescope.
I enjoy looking at the sun and have both H-alpha and CaK solar telescopes. The reality is, I have used my H-alpha scope about ten times as often as my CaK scope. Up ‘til now, that is.
The Problem with CaK
Convenience is one of the reasons I don’t use my CaK scope as often as my H-alpha scope. You cannot just pop in an eyepiece and expect to see much. The CaK frequency is at approximately 393 nm – near the limit of detection by the human eye. The situation only gets worse with age. At 60 years, I can see a purple ball and a sharp edge of the sun when I’m focused, and that’s it. I can see no surface features.
The most common way to get around this problem is to combine a CaK scope with a video or CCD-type camera. This approach works and is fine for recording the images, but it is not convenient. I took this limitation as a challenge, and I believe I have come up with a viable real-time solution.

A Chemically Enhanced Image – No Electronics Needed
My solution is to build an eyepiece that incorporates a fiber-optic bundle (a.k.a. fiber-optic plate). I coated one side of the plate with a thin UV-sensitive phosphorescent paint, and I look at the image generated on the other side of the bundle using an eye-inspection loupe.
The physics at work are simple: This DIY eyepiece converts a higher-energy frequency to a lower-energy frequency. This lower energy is in well within the visible spectrum and is thus easier to see. No electronics are needed in this solution. Rather than a digitally enhanced image, it produces a “chemically enhanced” image.
The Parts List
These are items I used to make my CaK eyepiece: (1) 1.25 inch-long 1.25 inch-diameter copper tube for the eyepiece body. (2) An
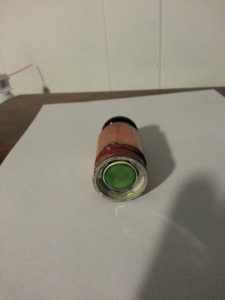
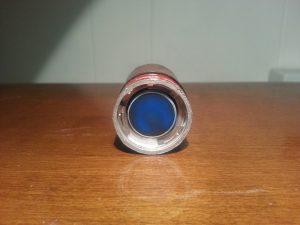
inspection loupe that can be adjusted for focus. I used a Surplus Shed (L2085) 12-power triplet magnifier. (3) A fiber-optic bundle. In my case, I used one from an old, burnt-out MX9916 image-intensifier unit. I purchased mine from Wilcox Engineering Company in California. I chose this because its diameter was exactly 1.25 inch, which made attaching the unit to the copper-tube body very easy. [Note: The MX9916 fiber optic unit comes from an image intensifier which is an ITAR export-controlled item. Purchasers outside of the U.S. may have to look for other similar items available locally.] (4) Florescent acrylic paint. I picked two colors, “scorching yellow” and “Electric blue,” which I picked up at a local arts-and-craft store. The yellow version is easier to see. The blue version produces a more natural CaK image. (5) You also need a small paint bush, some glue and water to complete project.
Assembling the Eyepiece
The fiber optic unit must be clean of any coatings and must be kept clean of dust. Any dust that remains will be visible when using the eyepiece.
The most difficult (and important) part of this project is applying a coat of paint to the bottom of the fiber-optic glass. This coating has to be thin, semi-transparent and uniform to produce a good image. Getting just the right painted surface is a bit of an art. It took me about five tries before I got it right.
I found that the best method is to position the bundle with the bottom pointed up. Apply one drop of paint, then wet the brush with a bit of water and swirl the paint until its uniform. Then leave it alone, and let it dry for an entire day. Once this is done, the rest is easy.
Attach the loupe to one end of the copper tube and the fiber-optic bundle to the other end. The painted surface points outward – it is
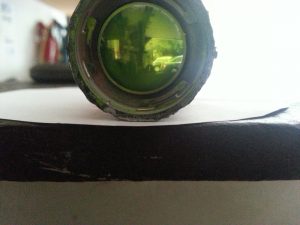
the surface upon which the solar image is focused.
Using the Eyepiece
To use this eyepiece, drop it into the 1.25-inch eyepiece holder of your CaK scope. Focusing is a two-step process: (1) Focus using the scope focuser until image is as sharp as possible. (2) Then focus the eyepiece loupe until the final image is as sharp as possible.
Results
Resolution and image sharpness are dependent on the quality of the applied coating and the limiting resolution of the fiber-optic bundle. The MX9916 has about 30 line pairs per millimeter, which is decent, but not great. Nonetheless, I can see sunspots, CaK
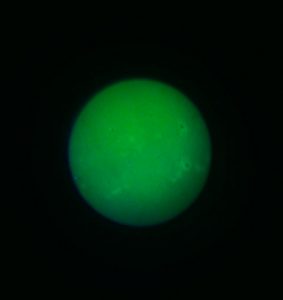
patches and other disk features – features that were not visible to my viewing eye before using this eyepiece with my CaK scope. Sadly, prominences are still not visible. They are just too dim.
Overall, I am pleased with results of this project. Armed with two “chemically enhanced” CaK eyepieces, I can now use my CaK solar scope just like any other telescope.
###
The Astronomy Technology Today editorial staff would like to take this opportunity to remind you of the availability of our Solar eclipse equipment guide – The Definitive Equipment Guide to the 2017 Solar Eclipse. Our goal with the 40-page publication is to provide an easy-to-consume introduction to the technological options for viewing and imaging the Great Solar Eclipse. We cover the gamut of options available including building your own solar viewer, solar glasses, smart phones, DSLR cameras, using astronomy telescopes, solar telescopes, using binoculars, solar filters (including a DYI filter option), CCD astro cameras, astro video cameras, webcams and much more. You can view the guide on our website here – its free and there is no requirement to sign up to read the guide.